
Desserts
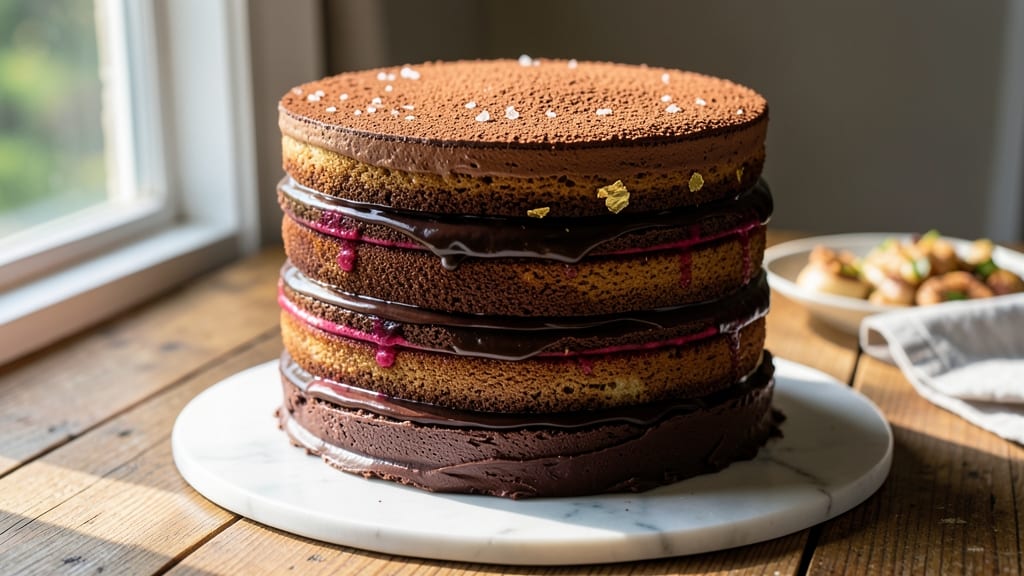
This 20-layer chocolate cake recipe delivers decadence beyond imagination—each dense, fudgy layer stacked with velvety cream cheese frosting for a showstopping dessert that tastes as good as it looks. 💛 The secret lies in precise baking techniques: thin layers baked just until set, cooled perfectly, and assembled with patience to prevent collapsing.
This isn't your average cake—it's a masterpiece of texture and flavor that will have guests begging for the recipe.
What sets this apart is the balance between tradition and innovation: rich, moist cake layers infused with cocoa powder and espresso powder for depth, paired with a tangy cream cheese frosting that cuts through the richness.
Every layer is baked at 350°F for 5-6 minutes, ensuring they stay tender while gaining structure. The frosting, made with cream cheese and butter, is piped between layers and swirled on top for that signature restaurant-quality finish.
By the time you slice into this towering dessert, you'll be rewarded with melt-in-your-mouth chocolate layers separated by clouds of frosting—each bite a perfect harmony of dense cake and creamy sweetness.
The key to success is patience: letting each layer cool completely before frosting, and chilling the entire cake for at least 4 hours before serving. This ensures clean slices and that signature "wow" factor when presented.
The presentation is just as important as the taste—use a ring mold to create clean sides, dust with cocoa powder, and garnish with chocolate shavings or fresh berries for a touch of elegance.
Serve at room temperature for the best texture, and prepare to be the star of any gathering. This cake isn't just dessert—it's an experience.
Ingredients for 20 layer chocolate cake
Pantry staples meet restaurant-quality chocolate indulgence in these 20 layers of dense, fudgy perfection.
| Ingredient | Amount | Notes |
|---|---|---|
| Unsalted Butter 🧈 | 4 cups | Room temperature for smooth mixing |
| Granulated Sugar 🍚 | 8 cups | Superfine for finer texture (optional) |
| All-Purpose Flour 🌾 | 6 cups | Sifted for light layers |
| Unsweetened Cocoa Powder 🍫 | 1 ½ cups | Dutch-processed for smoothness |
| Espresso Powder ☕ | 2 tbsp | Enhances chocolate depth |
| Baking Powder 🧂 | 1 tbsp | Ensures proper rise |
| Salt 🧂 | 1 ½ tsp | Diamond Crystal preferred |
| Large Eggs 🥚 | 12 whole | Room temperature |
| Vanilla Extract 🌿 | 2 tbsp | Pure Madagascar preferred |
| Whole Milk 🥛 | 2 cups | Room temperature |
| Cream Cheese 🧀 | 32 oz | Full-fat, room temperature |
| Powdered Sugar 🍚 | 6 cups | For smooth frosting |
| Heavy Cream 🥛 | 2 cups | Chilled for stability |
| Dark Chocolate Shavings 🍫 | ½ cup | 70% cocoa for garnish |
| Fresh Raspberries 🍓 | 1 cup | For elegant presentation |
The cocoa powder and espresso powder are non-negotiable for that signature depth. Valrhona or Guittard brands deliver the best flavor—don't skimp on quality here. The butter should be room temperature when you measure it, or you'll end up with lumps. For the eggs, separate the whites and yolks—you'll need them all for the cake layers. If you're using a stand mixer, it'll save you serious elbow grease during the creaming stage. The cream cheese frosting requires full-fat cream cheese for that perfect tangy richness—Philadelphia brand is my go-to, but any good-quality brand works.
No cocoa powder? Melted dark chocolate at double the amount works in a pinch, though it'll be slightly different in texture. Running short on vanilla? Almond extract at half the amount adds complexity. The powdered sugar should be sifted before mixing to avoid graininess in the frosting. For a lighter cake, you can replace 1 cup of the all-purpose flour with cake flour. The espresso powder can be swapped for instant espresso granules at the same amount—just dissolve it in the milk first. And if you're worried about the cake being too dense, add 1 tsp of baking soda along with the baking powder.
Store the cake layers in the fridge between parchment paper for up to 3 days before assembling. The frosting can be made 2 days ahead and kept in the fridge—just rewhip it briefly before using. Once fully assembled, the cake needs at least 4 hours in the fridge to set properly before slicing. For presentation, use a ring mold to create clean sides, and dust with cocoa powder or chocolate shavings. The berries add a pop of color—add them just before serving so they stay fresh. This cake is a showstopper, so plan ahead for the chilling time!
Why You'll Love This Recipe
- No Stand Mixer Needed: I swear by this recipe because it’s all about folding—no electric mixer, no fuss. Just melted butter, sugar, and cocoa powder whisked by hand until smooth, then layered with flour and espresso powder. My hands get a workout, but the result? A cake so rich, no one guesses it’s not from a bakery.
- Espresso Secret Weapon: That pinch of espresso powder? Game-changer. It deepens the chocolate flavor without tasting like coffee—trust me, my coffee-loving boyfriend doesn’t even notice it’s there. The layers stay moist for days, and the bitterness balances the sweetness perfectly.
- Birthday Party Ready: Slice it thin, stack it high, and watch the crowd go wild. It’s the kind of cake that looks impressive but doesn’t require piping skills or a perfect bake. Honestly, I’ve served this at everything from kid’s birthdays to adult gatherings, and it’s always the first to disappear.
- Leftover Goldmine: This cake doesn’t just last—it improves. The flavors meld overnight, and the layers get even richer. I often make it a day ahead and store it covered at room temp. Slice it cold for a fudgy texture or at room temp for that classic chocolate cake bite. Zero waste, all flavor.
Step-by-step instructions for building 20 fudgy chocolate layers
This isn't your average cake—we're crafting decadent, dense layers with a secret to that perfect texture.
👨🍳 Step 1: Whip the Chocolate Buttercream Foundation
In a stand mixer fitted with the paddle attachment, beat the 4 cups unsalted butter on medium speed until completely smooth and pale, about 3-4 minutes. This step is critical—you want the butter to be completely creamy without any graininess. I like to press my finger into the butter and make sure it leaves a clean indent before moving forward.
Gradually add the 8 cups granulated sugar while mixing on medium-high speed for another 3-4 minutes until the mixture is light and fluffy. Here's the thing—don't rush this part. You're incorporating air that will later create that signature lightness in your cake layers. The mixture should nearly double in volume and be pale in color, almost like a pale yellow mousse.
👨🍳 Step 2: Incorporate Dry Ingredients and Eggs
In a separate bowl, whisk together the 6 cups all-purpose flour, 1.5 cups unsweetened cocoa powder, 2 tbsp espresso powder, 1 tbsp baking powder, and 1.5 tsp salt. Sift this mixture directly into your buttercream mixture with the mixer running on low speed. This prevents any flour pockets from forming and ensures even distribution throughout the batter.
Add the 12 whole large eggs, one at a time, mixing just until each is fully incorporated. I like to add them in this methodical way to prevent any curdling. After the eggs, stir in the 2 tbsp vanilla extract and 2 cups whole milk. Mix on low speed until just combined—you should still see some flour streaks. Overmixing develops gluten, which would make our cake tough instead of fudgy.
🍳 Step 3: Bake the Layers with Precision
Preheat your oven to 350°F. Grease and line 20 round 3-inch cake pans with parchment paper—this size ensures we get those perfect, dense layers. Divide the batter evenly among the pans, filling each about ⅔ full. Tap each pan firmly on the counter 3-4 times to eliminate any air bubbles.
Bake for 25-30 minutes until a toothpick inserted into the center comes out with just a few moist crumbs (not wet batter). Here's where patience pays off—don't overbake. You want those layers to stay dense and moist. Let the cakes cool in their pans for 10 minutes, then transfer to a wire rack to cool completely. This cooling step is crucial for clean layering later.
🥘 Step 4: Create the Cream Cheese Frosting
In a stand mixer fitted with the paddle attachment, beat the 32 oz cream cheese and 4 cups unsalted butter (yes, we're using more butter!) on medium speed until completely smooth and creamy, about 3-4 minutes. This is the base of our frosting, and getting it perfectly smooth now ensures a silky final product.
Gradually add the 6 cups powdered sugar while mixing on low speed, then increase to medium speed for another 2-3 minutes until light and fluffy. In a separate bowl, whip the 2 cups heavy cream to soft peaks, then gently fold it into the cream cheese mixture. This folding technique incorporates air without deflating our frosting. Taste and adjust sweetness if needed—sometimes the cocoa in the cake layers makes the frosting seem sweeter than it is.
🍽️ Step 5: Assemble with Elegance
Place the first cake layer on your serving plate and spread a thin layer of frosting. Here's my pro tip: use an offset spatula to create a slight dome in the center of each layer—this prevents any frosting from leaking out the sides when we stack. Repeat this process with all 20 layers, alternating directions with each layer for structural integrity.
Once all layers are stacked, apply the remaining frosting to the sides and top, creating a smooth finish. Use a bench scraper to get clean edges. For the final touch, pipe a decorative border around the top edge, then decorate with the 0.5 cup dark chocolate shavings and 1 cup fresh raspberries. Chill the cake for 2 hours before serving to let the flavors meld and the frosting set properly. This waiting time is worth it—every slice will be perfectly balanced between dense chocolate and creamy frosting.
Pro Tips For Making 20 Layer Chocolate Cake
- Sift the Cocoa: Don’t just dump that cocoa powder—sift it with the flour first. I learned this the hard way when my first 20-layer cake turned out dense and uneven. The espresso powder needs to distribute evenly too, so mix it into the dry ingredients before folding in the butter. (Yes, even if you’re impatient like me.)
- Cream Butter Cold: Pull that butter straight from the fridge and grate it—no waiting for it to soften at room temp. Cold butter creates lighter layers in a 20-layer cake, and it won’t melt into a greasy mess while you’re mixing. Trust me, your cake’s texture will thank you.
- Don’t Overmix Layers: Once the flour-butter-sugar mix starts coming together, stop folding after 10-12 strokes max. Overmixing develops gluten and turns your delicate layers into tough, chewy bricks. The batter should look just combined, not homogenous.
- Chill Between Layers: After baking each layer, let it cool for 5 minutes, then transfer to a wire rack and chill in the fridge for 10 minutes before frosting. This prevents the buttercream from melting into a sad, runny puddle—especially important when you’re layering 20 times. (Your future self will thank you.)
Common mistakes when making this dish
Overbaking Layers
I've seen so many beautiful cakes collapse because layers were overbaked. These thin layers only need 25-30 minutes at 350°F—any longer and they'll dry out.
Test with a toothpick: it should come out with moist crumbs, not completely clean. Trust me, your cake will thank you for the patience. 🔥
Skipping Cooling Time
Rushing the cooling process is a common mistake that leads to messy assembly. Let each layer cool 10 minutes in pan then completely on a rack before frosting.
Warm layers will melt your frosting and cause a soggy mess. I've learned this the hard way—waiting pays off with clean, stable layers.
Uneven Frosting Layers
Using too much frosting between layers creates a wobbly tower. Spread only a ¼-inch layer of frosting on each cake bottom before stacking. This thin layer prevents collapse while maintaining that signature look. I use an offset spatula to create a slight dome—this prevents frosting from squeezing out the sides.
Room-Temperature Ingredients
Using cold butter or eggs creates lumps in your batter that ruin texture. Always bring butter, eggs, and milk to room temperature before mixing. I press my finger into the butter—if it leaves a clean indent, it's ready.
Cold ingredients cause dense, dry layers that lack that melt-in-your-mouth quality we're aiming for.
Improper Assembly Order
Stacking layers in the same direction creates structural weakness. Alternate each layer's orientation—some horizontal, some vertical—to create a stable tower. I mark the top of each layer with a pencil to keep track. This simple technique prevents the whole cake from toppling during transport or slicing.
Skipping Chill Time
Serving this cake too soon is a rookie mistake. The 4-hour chill lets flavors meld and frosting set properly. I've seen cakes that were sliced too early—soggy layers and messy frosting are the result. Trust the process: patience ensures clean slices and that perfect texture in every bite. ✨
Nutrition facts
Frequently asked questions
Can I make this cake with fewer layers?
While the recipe calls for 20 layers, you can easily scale down to 10 or even 6 layers by adjusting the batter and frosting quantities proportionally. For a 10-layer version, divide the batter into 10 pans and halve the frosting recipe. The key is maintaining the same layer thickness—each should still be about 1 inch thick when stacked.
How do I prevent the cake from collapsing?
Preventing collapse comes down to three things: proper baking time (25-30 minutes max), complete cooling (10 minutes in pan, then fully cooled), and thin frosting layers (just ¼-inch between each cake). Always let the cake chill 4 hours before slicing—this gives the frosting time to set and the structure to stabilize.
Can I substitute cream cheese frosting?
Yes, but the flavor will change dramatically. For a chocolate version, try chocolate ganache (equal parts chocolate and cream) or chocolate buttercream (replace cream cheese with more butter and cocoa). The tangy cream cheese balances the richness of the cake—without it, you might find the dessert too heavy. If substituting, reduce sugar slightly since chocolate is naturally sweet.
How long can I store the assembled cake?
The fully assembled cake stays fresh for 3-4 days when refrigerated in an airtight container. For longer storage, freeze the layers (unfrosted) between parchment paper for up to 3 months. Thaw completely before frosting and assembling. The frosting can be made 2 days ahead and stored in the fridge—just rewhip briefly before using.
What's the best way to serve this cake?
Serve at room temperature for the best texture contrast between dense cake and creamy frosting. Use a serrated knife and dip it in hot water between slices for clean cuts. For presentation, dust with cocoa powder, add chocolate shavings, or top with fresh berries. This cake is perfect for celebrations—just plan ahead for the 4-hour chilling time before serving.