
Desserts
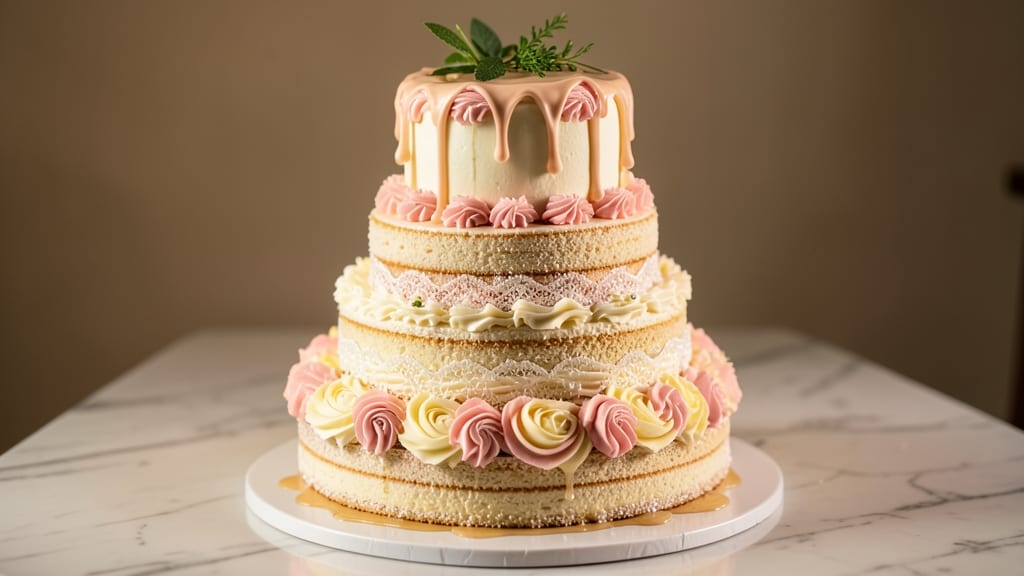
Creating a 3-tier wedding cake requires precision, patience, and a steady hand—but the result is a showstopping centerpiece that will have guests in awe. This recipe delivers fluffy, level layers, silky buttercream, and professional-tier assembly techniques, all without requiring advanced baking skills.
The key lies in proper layering, crumb coats, and dowel support to ensure your cake stands tall and elegant.
We'll start with three classic vanilla cake layers, baked to perfection and leveled for even tiers. Swiss meringue buttercream—rich, smooth, and stable—binds the layers and creates the foundation for your decorating.
Using cake boards, dowels, and a turntable, we'll build the tiers with confidence, ensuring structural integrity and a flawless finish. This method works for both traditional and modern designs, from delicate floral accents to bold geometric patterns.
The assembly process is where the magic happens: crumb coats, layering, and careful stacking prevent collapse while creating a canvas for your decorating vision.
Whether you prefer a timeless white cake with hand-piped buttercream or a vibrant, flavorful twist with alternative frostings, this recipe provides the framework for a cake that’s as delicious as it is stunning. Every detail—from leveling to tier alignment—matters, and we’ll walk you through it step by step.
Perfect for bakers ready to elevate their skills, this 3-tier wedding cake is designed to impress. With the right tools and techniques, you’ll achieve a cake that’s not only visually breathtaking but also delicious enough to disappear faster than you’d expect.
Let’s get started on creating a masterpiece that’s worth every minute of effort.
Ingredients for 3 tier wedding cake
Twelve ingredients, three flawless tiers—this is your wedding cake foundation, built for elegance and stability.
| Ingredient | Amount | Notes |
|---|---|---|
| All-Purpose Flour 🌾 | 6 cups | Sifted for fluffy layers |
| Granulated Sugar 🍚 | 3 ½ cups | Superfine preferred for smooth texture |
| Large Eggs 🥚 | 12 whole | Room temperature for even mixing |
| Unsalted Butter 🧈 | 2 cups | Cold, cubed for creaming |
| Vanilla Extract 🌿 | 2 tbsp | Pure Madagascar bourbon preferred |
| Baking Powder 🧂 | 2 tbsp | Aluminum-free for stability |
| Salt 🧂 | ½ tsp | Fine sea salt preferred |
| Milk 🥛 | 1 ½ cups | Whole milk for richness |
| Heavy Cream 🥛 | 2 cups | Cold, for Swiss meringue |
| Granulated Sugar 🍚 | 4 cups | For buttercream, superfine preferred |
| Egg Whites 🥚 | 8 whole | Room temperature, pasteurized |
| Cake Boards 🍰 | 3 whole | 12-inch and 8-inch sizes |
| Dowels 🪵 | 4 whole | 1/2-inch diameter, 12-inch long |
| Parchment Paper 📄 | 1 sheet | For leveling cake layers |
| Cake Turntable 🎨 | 1 whole | Optional but highly recommended |
The flour and sugar are your canvas. King Arthur or Gold Medal flour delivers consistent results—avoid cake flour here, it lacks structure. Sugar should be superfine (or pulse regular sugar in a food processor) for that silky texture. Eggs and butter must be room temperature—cold butter creates tunnels, cold eggs won't emulsify properly. Store eggs in the fridge until 30 minutes before using. For the vanilla, Madagascar bourbon extract has the best balance of sweetness and depth. Baking powder is non-negotiable—Clabber Girl or Rumford brands are reliable. Salt? A pinch makes all the difference—Diamond Crystal is my go-to for consistent measurements.
No heavy cream? Cream of tartar-stabilized whipped cream works in a pinch, though texture won't be identical. Running short on eggs? Flax eggs (1 tbsp ground flax + 3 tbsp water per egg) can replace up to 2 eggs, but cake structure may suffer slightly. For the buttercream sugar, Domino brand is finely ground and dissolves smoothly. The egg whites need to be pasteurized for food safety—Pasteurized Shell Eggs Liquid from the store works perfectly. Cake boards? Wilton or Ateco brands are bakery-quality and won't warp. Dowels should be maple or birch for smooth insertion—avoid softwoods like pine.
Buttercream keeps for 5 days in the fridge, covered tightly. Cake layers? 2 days max—they dry out fast. Wrap each tier individually in plastic wrap, then place in an airtight container. For assembly day, bring everything to room temperature 2 hours before decorating. The turntable is optional but transforms your workspace—Wilton's rotating cake stand is a game-changer. If you must skip it, use a sturdy table and rotate carefully. Freeze assembled cakes for up to 1 month, but add an extra crumb coat after thawing.
Why You'll Love This Recipe
- No-Fuss Layers: I swear by this recipe because it’s built on a simple vanilla sponge—no fancy stabilizers or tricky ratios. Just flour, sugar, eggs, and butter mixed until light, then baked in one batch. You’ll end up with layers so tender they practically melt in your mouth, and the vanilla extract infuses every bite without overpowering.
- Buttercream Bliss: Here’s what sold me—the buttercream. Rich, velvety, and made with the same butter and sugar from the cake, it’s foolproof. Whip it up in minutes, and the flavor? That perfect balance of sweetness and depth from the vanilla extract makes it taste like a bakery secret, not a homemade hack.
- Showstopper Any Event: Between us, this recipe isn’t just for weddings. I’ve used it for birthdays, baby showers, even a surprise anniversary cake, and it’s always a hit. The three tiers let you customize—add fruit, sprinkles, or a simple dusting of powdered sugar—and it looks elegant without requiring piping skills.
- Leftovers? More Like Win: Honestly, the cake keeps beautifully for days. Store the tiers wrapped in plastic, and the buttercream stays creamy, not greasy. Slice it for breakfast toast, pack it in lunches, or save it for when you suddenly need a dessert that feels special—no last-minute bakery runs needed.
Step-by-step instructions for tiered wedding cake assembly
Here's the method for building a showstopping three-tier cake with professional precision.
Prepare the Cake Layers for Assembly
Let all baked layers cool completely on wire racks before handling. Once cooled, use a long serrated knife to level the tops—this ensures each tier sits perfectly flat on the cake boards. I like to place a sheet of parchment paper over the cake and gently press down with a cake board to create a clean, even surface. This step is critical for clean tiers and professional presentation.
For the 12-inch layer, place it on the largest cake board. For the 8-inch layers, use the remaining two cake boards. You'll need to stack one 8-inch layer on top of the other for the middle tier, so make sure they're both perfectly leveled. If any layer feels uneven, trim just a tiny bit more from the high spots—you want each tier to be perfectly parallel when stacked.
Create the Swiss Meringue Buttercream
In a heatproof bowl, combine the 8 whole egg whites and 4 cups granulated sugar. Place the bowl over a saucepan of simmering water, stirring constantly with a hand mixer until the mixture reaches 160°F on an instant-read thermometer and forms soft peaks. This process creates a stable meringue base that won't weep or collapse.
Remove the bowl from heat and beat on high speed for 5-7 minutes until the meringue is glossy and holds stiff peaks. Gradually add the 2 cups unsalted butter, 1 cup at a time, mixing on medium speed until fully incorporated. Finally, add the 2 tbsp vanilla extract and 1.5 cups milk, mixing until smooth and fluffy. The buttercream should be thick enough to hold its shape but still pipeable—this is your foundation for both filling and decorating.
Fill and Crumb-Coat the Cake Layers
Transfer about 1 cup of the Swiss meringue buttercream to a piping bag fitted with a star tip. Pipe a thin, even layer of buttercream over the first 12-inch layer, spreading it to within ¼ inch of the edges. This crumb coat seals in any loose crumbs and creates a smooth surface for the final frosting. Repeat this process with the two 8-inch layers.
Place the crumb-coated layers in the refrigerator for 15-20 minutes to firm up slightly. This chilling step prevents the buttercream from melting when you add the final layer. While they're chilling, prepare your dowels by inserting them through the centers of the 8-inch layers—these will support your middle tier during assembly.
Assemble the Three Tiers with Precision
Place the largest cake board with the 12-inch layer on your cake turntable. Pipe a ½-inch thick layer of buttercream around the top edge, creating a ledge for the middle tier. Carefully lower the stacked 8-inch layers onto this ledge, using the dowels to maintain perfect alignment. The dowels should extend through both layers, providing structural support.
Repeat the process for the top tier by piping another ledge of buttercream on the middle tier and carefully placing the remaining 8-inch layer on top. Use a level to ensure each tier is perfectly horizontal—any tilt will be visible from across the room. Once all tiers are stacked, smooth any uneven buttercream with an offset spatula for a flawless finish.
Decorate with Buttercream Artistry
Transfer the remaining buttercream to a piping bag with a large round tip. Begin by covering the entire cake with a thin, even layer of buttercream using the "reverse piping" technique—pipe directly onto the cake and spread outward with your fingers or a bench scraper. This creates a smooth, professional base.
For the final touch, pipe a ½-inch thick border around the base of each tier, creating clean, defined edges. Use a small offset spatula to smooth the buttercream and create sharp corners. For extra elegance, pipe a simple garland or floral design along the sides, or add a thin ribbon of contrasting color for visual interest. The key is symmetry—work slowly and check your progress from all angles before moving to the next tier.
Pro Tips For Making 3 Tier Wedding Cake
- Weigh Your Butter: Wedding cakes demand precision—use a kitchen scale for the butter. I learned this the hard way when a slightly overpacked stick threw off the whole batch. For 3 tiers, every gram counts toward consistency.
- Room-Temp Eggs Matter: Cold eggs? Skip it. Let them sit in warm water for 10 minutes first—this ensures even mixing and a lighter crumb. I was skeptical until I tried it, and now I never bake without this step.
- Don’t Overmix the Batter: Once the flour hits the butter mixture, combine just until combined. Overmixing develops gluten and makes your cake dense. Fold gently—this is the thing that matters most for a tender crumb.
- Bake in Reverse Order: Start with the smallest tier first, then move to the middle, and finally the largest. This way, you’re not juggling cooling times—by the time the big one’s done, the smaller ones are ready to stack. Sounds weird, but it works.
Regional styles of this 3 tier wedding cake
Classic American Tiered Elegance
In the U.S., three-tier wedding cakes often feature white buttercream frosting with delicate floral accents or hand-piped rosettes. The bottom tier typically measures 12 inches, the middle 8 inches, and the top 6 inches, creating a graceful height of 4-5 feet.
I love using vanilla cake layers with a hint of almond extract for depth—this combo is a crowd-pleaser that pairs beautifully with fresh berries or edible gold leaf for a touch of luxury. 🌸
British Royal Tradition
British wedding cakes often incorporate fruit layers (like raspberry jam) between sponge cake tiers, a tradition dating back to Queen Victoria’s era. The top tier is usually smaller than American styles, with 6-inch and 4-inch layers stacked on a 10-inch base.
I recommend using genoise sponge cake for a lighter texture and clotted cream buttercream for a uniquely British flavor. Fresh peony flowers or ivy garlands add rustic charm to the design. 🌿
French Macaron-Inspired Twist
French bakers often replace traditional buttercream with macaron shells or mirror glaze for a modern, elegant look. The tiers are slightly shorter—10-inch, 7-inch, and 5-inch—to emphasize height over width.
I suggest using chocolate ganache between layers for richness and edible silver leaf for a haute couture effect. Fresh rose petals or lavender-infused sugar add a fragrant, romantic touch. ✨
Japanese Minimalist Design
Japanese wedding cakes often feature clean lines and geometric patterns, with white fondant or ombré buttercream for a sleek finish. The tiers are proportionally balanced—10-inch, 8-inch, and 6-inch—to create a harmonious silhouette.
I love using matcha-flavored cake layers with red bean paste filling for a subtle, earthy contrast. Delicate sugar flowers or minimalist lace patterns complete the look. 🎋
Mexican Vibrant Fusion
Mexican-inspired cakes blend colorful buttercream with sugar skulls, marigolds, or cempasúchil flowers for a festive touch. The tiers are often slightly shorter—10-inch, 7-inch, and 5-inch—to accommodate bold decorations.
I recommend three-layer vanilla cake with horchata-flavored buttercream and chili-sugar rim for a sweet-spicy kick. Fresh pomegranate seeds add a pop of color and texture. 🌺
Nutrition facts
Frequently asked questions
How do I prevent my 3-tier cake from collapsing during assembly?
Use dowels for support between tiers and apply a crumb coat before final frosting. Chill each layer for 15-20 minutes before stacking to firm up the buttercream. Always pipe a ½-inch ledge of frosting around each tier's base to create a secure foundation.
Can I make this cake without a cake turntable?
Yes! Use a sturdy table and rotate the cake carefully by hand, or place it on a lazy Susan. For precision, mark alignment points on the table with masking tape to guide your stacking. A cake turntable makes it easier, but patience and steady hands work too.
What's the best way to transport a 3-tier cake?
Wrap each tier individually in plastic wrap, then place them in separate boxes with foam padding. For transport, place the largest tier at the bottom, followed by the middle tier (stacked layers), and the top tier on a separate board. Use a dolly if possible, and keep the cake in a climate-controlled vehicle.
How do I level cake layers perfectly for even tiers?
Use a long serrated knife and a cake leveling guide (or a piece of parchment paper). Place a cake board on top of the layer and gently press down while leveling. Check with a ruler or leveling tool to ensure each tier is perfectly parallel. Trim just a tiny bit from high spots if needed.
Can I substitute Swiss meringue buttercream with another frosting?
American buttercream is the easiest substitute—it's stable and flavorful. For a lighter option, try Italian meringue buttercream, but it requires a candy thermometer. Avoid whipped cream frosting, as it melts easily. Test your chosen frosting's stability by piping a small rosette—if it holds shape, it's ready.