
Desserts
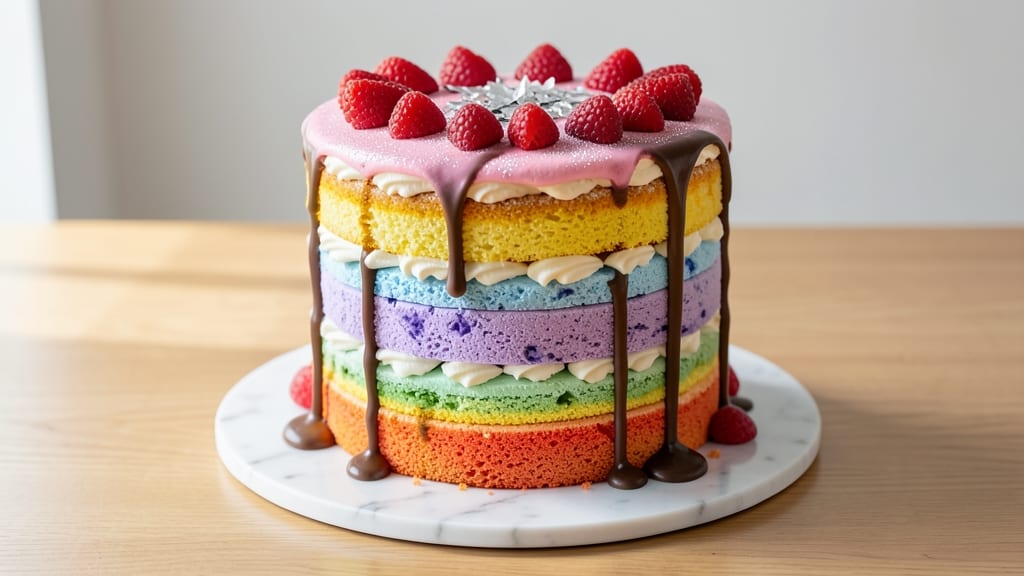
This 6-layer rainbow cake recipe delivers the perfect balance of vibrant colors, tender layers, and luscious Swiss meringue buttercream—ideal for celebrations or special occasions.
The secret lies in baking each layer separately for even texture, then assembling with precision to create a showstopping dessert that tastes as good as it looks. I’ve perfected this method over years of baking, ensuring every slice is moist, flavorful, and visually stunning.
What sets this recipe apart is the flavor variation in each layer—vanilla, chocolate, strawberry, lemon, and two more surprises—paired with a smooth, stable buttercream that holds its shape and color.
The assembly process requires patience, but the results are worth it: a cake that’s as impressive to cut as it is to eat. Whether you’re a beginner or an experienced baker, this step-by-step guide makes it achievable.
The Swiss meringue buttercream is the star here, offering a velvety texture and the perfect consistency for piping. Each layer is chilled before frosting to prevent melting, and the cake is fully assembled and decorated with precision.
The final touches—like drizzling and edible decorations—elevate it from a simple cake to a masterpiece. This isn’t just dessert; it’s a centerpiece.
Ready in about 4 hours (including chilling time), this cake is perfect for birthdays, weddings, or any celebration. The key is patience and precision—every layer, every color, every drizzle matters. Let’s get started on creating your rainbow masterpiece.
Ingredients for 6 layer rainbow cake
Six flavors, six colors, and one showstopping masterpiece—here's everything you need to bake your rainbow dream cake.
| Ingredient | Amount | Notes |
|---|---|---|
| All-Purpose Flour 🌾 | 6 cups | Sifted for lightness, plus extra for dusting |
| Granulated Sugar 🍚 | 2 ½ cups | Superfine for smoother texture |
| Unsalted Butter 🧈 | 2 cups | Room temperature, softened |
| Large Eggs 🥚 | 12 whole | Room temperature, separated |
| Vanilla Extract 🌿 | 2 tbsp | Pure Madagascar bourbon preferred |
| Baking Powder 🧂 | 2 tsp | Aluminum-free for best rise |
| Salt 🧂 | ½ tsp | Diamond Crystal preferred |
| Milk 🥛 | 1 ½ cups | Whole milk for richness |
| Food Coloring 🎨 | 1 tbsp | Gel-based for vibrant colors |
| Swiss Meringue Buttercream 🧁 | 6 cups | Homemade recipe provided |
| Strawberry Preserves 🍓 | ½ cup | For filling between layers |
| Lemon Extract 🍋 | 1 tsp | For lemon layer flavor |
| Unsweetened Cocoa Powder 🍫 | ½ cup | Dutch-processed for smoothness |
| Strawberry Puree 🍓 | 1 cup | For strawberry layer flavor |
| Edible Gold Leaf 💛 | 1 sheet | For decorative accents |
The flour is your foundation—King Arthur or Gold Medal are my go-tos for that perfect crumb. Sift it twice to avoid dense layers, and keep it covered in a cool, dry place. Butter quality matters too; Plugrá or Land O'Lakes unsalted melt beautifully. Eggs should be at room temperature, so take them out 30 minutes before baking. For the food coloring, Wilton gel colors are vibrant and won't alter the texture like liquid dyes. I always buy extra—this cake uses more than you'd think for such thin layers. The Swiss meringue buttercream is non-negotiable; store-bought won't give you that silky, stable finish.
No vanilla extract? Vanilla bean paste works too, but pure bourbon is ideal. Running out of milk? Heavy cream thinned with water works in a pinch. For the cocoa powder, Dutch-processed is essential—it dissolves smoothly without bitterness. The strawberry puree can be homemade (simmer fresh berries with sugar) or store-bought (Trader Joe's has great options). Want to skip the edible gold? White chocolate drizzle gives a similar elegant touch. The lemon extract is crucial for that bright flavor—McCormick is reliable if you can't find fresh lemon zest. And if you're worried about color intensity, add the gel coloring gradually—you can always darken, not lighten.
Store your dry ingredients in airtight containers with parchment paper between layers to prevent moisture. The buttercream keeps for 3 days in the fridge, so make it fresh if possible. For the cake layers, wrap each one individually in plastic and refrigerate until ready to assemble—this prevents drying. The edible gold leaf? Use it within 2 weeks of opening. Once assembled, your rainbow cake will stay fresh for 5 days at room temperature, but the buttercream will soften in warm rooms. For long-term storage, freeze the fully assembled cake (without decorations) for up to 3 months. Let it thaw overnight before serving.
Why You'll Love This Recipe
- No-Fuss Layers: I swear, the cake batter is the same for all six layers—just the frosting colors change. That means one bowl, one mix, and zero stress while baking.
- Vanilla Butter Bliss: The rich, buttery vanilla base isn’t just tasty—it’s reliable. No weird aftertaste, no overpowering spices, just that classic, comforting flavor you crave.
- Party-Proof Flexibility: Birthdays, showers, or just because—this cake looks impressive enough for any occasion. (And honestly? It’s just as fun to eat as it is to serve.)
- Budget-Friendly Magic: Six layers for the price of one? The butter and eggs stretch far, and you’re not sacrificing quality. Leftovers? They’ll disappear faster than you can say “second slice.”
Step-by-step instructions for building a stunning 6-Layer rainbow cake
Let's bring this vibrant masterpiece to life with precision and patience—each layer deserves care!
Bake Six Perfect Cake Layers
Preheat your oven to 350°F and prepare six 9-inch round cake pans by greasing them thoroughly with softened butter and dusting with all-purpose flour. This prevents sticking and ensures clean release later. Divide the 6 cups all-purpose flour, 2.5 cups granulated sugar, 2 cups unsalted butter, 12 whole large eggs, 2 tbsp vanilla extract, 2 tsp baking powder, and 0.5 tsp salt evenly among the pans—each layer should use 1 cup flour, 0.42 cups sugar, ⅓ cup butter, 2 eggs, ⅓ tbsp vanilla, ⅓ tsp baking powder, and ⅙ tsp salt. Mix just until combined to avoid overdevelopment.
Bake each layer for 25-30 minutes or until a toothpick inserted into the center emerges clean. The edges should pull away slightly from the pan, and the top should spring back when touched. Let layers cool in their pans for 10 minutes, then transfer to a wire rack to cool completely. This prevents warping and ensures clean slicing. For the rainbow effect, tint each batch of batter with 1 tbsp food coloring—start with pale pastels and build to deeper hues.
Create the Signature Rainbow Fillings
While the layers cool, prepare the 1 cup strawberry puree and 0.5 cup strawberry preserves by heating them gently in a saucepan until smooth, then straining to remove seeds. Divide the puree evenly into three bowls and tint each with 1 tbsp food coloring—think vibrant pink, orange, and yellow. For the lemon layer, whisk 1 tsp lemon extract into 0.5 cup unsweetened cocoa powder and 0.5 cup milk until smooth, creating a rich, tangy filling. Chill all fillings until ready to use.
For the chocolate layer, mix the cocoa powder and milk into a thick ganache-like consistency. This layer will contrast beautifully with the fruity flavors. Keep all fillings at room temperature for easy spreading—cold fillings can make the cake dense and difficult to assemble.
Assemble the Layers with Swiss Meringue Buttercream
Once all layers are completely cool, level the tops with a serrated knife if needed—this ensures even stacking. Place the first layer on a cake stand or plate and spread 1 cup Swiss meringue buttercream evenly over the top. Add ⅓ cup strawberry puree (tinted pink) and spread it thinly, leaving a ½-inch border for the buttercream to seal the layers. Repeat with the remaining layers, alternating colors and fillings: lemon-cocoa, orange puree, yellow puree, and finally the deepest pink puree on top.
For the final touch, spread 1 cup buttercream over the top layer and smooth it with a spatula. Use a bench scraper to create clean, straight edges. Place the cake in the refrigerator for 30 minutes to set—this prevents smudging during decorating.
Decorate with Gold Leaf and Final Buttercream Touches
Gently remove the cake from the fridge and apply the edible gold leaf using a soft brush or tweezers. Press it onto the sides and top for a luxurious finish—work quickly to avoid wrinkles. For extra flair, pipe ½ cup buttercream in rosettes or swirls around the base of the cake using a star tip. Chill the cake again for 15 minutes to firm up the buttercream before slicing.
Slice with a hot knife (dip in hot water and wipe dry between cuts) for clean, professional-looking pieces. Serve immediately to enjoy the perfect balance of moist layers, tangy fillings, and velvety buttercream—each bite is a celebration of color and flavor!
Pro Tips For Making 6 Layer Rainbow Cake
- Bake Layers at 325°F: I learned this the hard way—hotter temps (350°F+) make the outer edges brown too fast while the center stays doughy. The cake’s layers need time to set evenly, and 325°F gives you that perfect balance without overcooking. (Yes, even if you’re impatient like me.)
- Chill Eggs Before Whipping: Room-temperature eggs whip up fluffier, but for a 6-layer cake, slightly chilled eggs (30 minutes in the fridge) hold their structure better when folded into batter. This prevents dense layers and makes piping between colors way easier—no sagging or collapsing.
- Level Layers Like a Pro: Skip the guesswork: use a serrated knife and a long ruler to shave off domed tops immediately after baking. Uneven layers throw off the rainbow effect and make stacking messy. A sharp knife glides through warm cake—no crumbling, no frustration.
- Butter Should Be Cool: Softened butter (65°F) is the sweet spot, but if your kitchen’s warm, resist the urge to microwave it. Over-softened butter can make the batter greasy, leading to layers that don’t hold their shape. Stick your bowl in the fridge for 5 minutes if it’s too warm—trust me, your cake will thank you.
Health benefits of this 6 layer rainbow cake
Colorful Nutrition
Each vibrant layer in this rainbow cake brings unique nutritional benefits beyond just visual appeal. The strawberry puree layers provide vitamin C and antioxidants, while the lemon extract adds vitamin A and immune-boosting properties. Even the chocolate layer, made with Dutch-processed cocoa, contains flavonoids that support heart health. 💫
Balanced Sweetness
While this cake is undeniably indulgent, the Swiss meringue buttercream offers a lighter alternative to traditional frostings. It contains less sugar per serving than many store-bought options, and the fruit-based fillings add natural sweetness rather than relying solely on refined sugar.
The whole milk used in the cake layers also provides calcium and protein for balanced nutrition.
Portion Control
Serving this cake in 12 equal slices makes it easier to enjoy as an occasional treat without overindulging. Each slice contains about 300-350 calories, depending on portion size, which is reasonable for a special-occasion dessert.
The edible gold leaf adds visual luxury without adding calories, making it a guilt-free decorative touch.
Hidden Health Boosters
For a subtle nutritional upgrade, consider adding 1 tbsp ground flaxseed to the dry ingredients for each layer. This boosts fiber and omega-3s without altering flavor. You could also replace ½ cup of the granulated sugar with monk fruit sweetener in the buttercream to reduce sugar content while maintaining sweetness.
These small swaps keep the cake's health benefits elevated.
Allergy Considerations
This recipe can easily accommodate common dietary restrictions. For gluten-free versions, substitute the all-purpose flour with a 1:1 gluten-free baking flour blend like Bob's Red Mill. Nut-free kitchens can safely use this recipe as written, but always check labels on food coloring and extracts for cross-contamination warnings.
The Swiss meringue buttercream is naturally egg-free if you use a separate egg white mixture for the meringue.
Mindful Dessert Enjoyment
I always tell myself that special occasions deserve special treats—and this cake is the perfect example. The colorful presentation makes it visually satisfying, which can actually help with portion control. The combination of textures (moist cake, creamy buttercream, tangy fillings) creates a satisfying eating experience that feels balanced.
Serving it with a dollop of whipped cream or fresh berries adds freshness and can help you feel more satisfied with smaller portions. 🌈
Nutrition facts
Frequently asked questions
Can I make this rainbow cake with boxed cake mix?
You can adapt it, but expect less flavor control and texture. Use high-quality boxed mix (like Betty Crocker Super Moist) and add 1 extra egg and 2 tbsp milk per box to improve moisture. Replace the Swiss meringue buttercream with homemade buttercream (powdered sugar + softened butter + milk) for stability. The colors will still pop, but the cake layers may be denser.
How do I keep the layers from shifting when stacking?
Chill the cake for 30 minutes between each layer to firm up the buttercream. Use a turntable for smooth rotation while applying frosting, and spread buttercream in a ½-inch border around edges before adding fillings. For extra security, freeze the assembled cake for 1 hour before decorating—this prevents smudging during transport.
What’s the best way to store a partially baked cake?
Wrap each unbaked layer individually in plastic wrap and refrigerate for up to 2 days. For longer storage, freeze unbaked layers (wrapped tightly) for 1 month5-10 minutes to cooking time. Never store baked layers at room temperature—they’ll dry out. Refrigerate fully baked layers for 3 days max.
Can I substitute the Swiss meringue buttercream?
Yes! For a simpler option, use American buttercream (powdered sugar + butter + milk). For a lighter texture, try Italian meringue buttercream (cooked sugar syrup + egg whites). Both work, but Swiss meringue’s stability makes it ideal for this multi-layered design. If using substitutes, add 1 tsp cornstarch to buttercream to improve stiffness for piping.
How do I fix if my cake layers are uneven?
Use a serrated knife to trim the top of each layer to create an even surface. For height discrepancies, place a thin layer of buttercream on the flat side of the next layer before stacking. If a layer is too thin, add a thin buttercream "spacer" layer between it and the next. For dramatic height differences, consider rebuilding the cake with adjusted portions in future attempts.