
Desserts
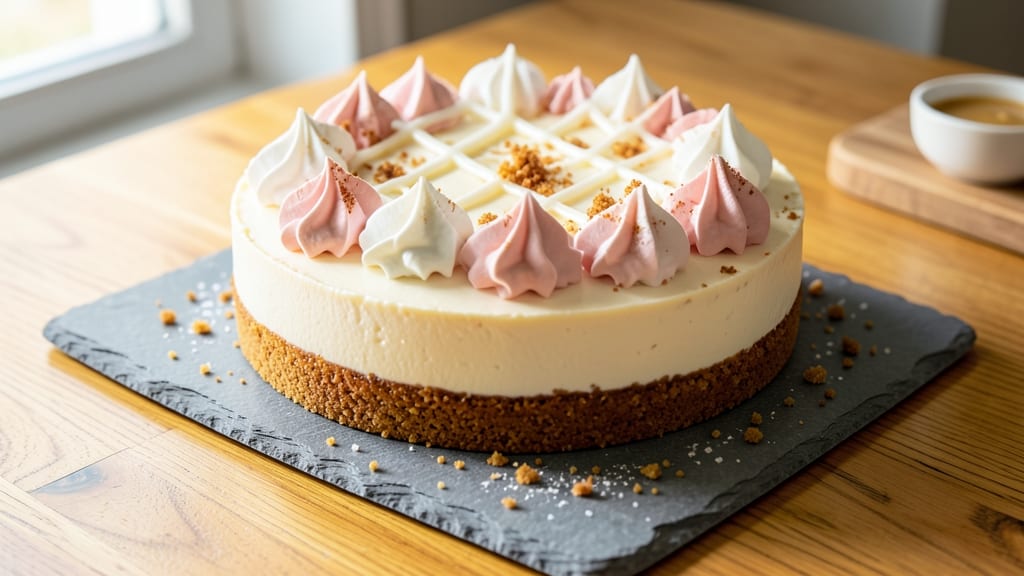
This no-bake 7-inch cheesecake recipe delivers the perfect balance of creamy filling and crunchy graham crust without a single oven turn-on. 💛 The secret lies in a foolproof chilled method that creates a silky center with a texture so smooth it practically melts in your mouth—ideal for those hot summer days when baking feels like a chore.
I developed this version after years of testing, ensuring every layer comes together effortlessly while still tasting like a restaurant dessert.
The graham crust gets pressed into the pan and chilled until firm, creating a sturdy base that holds up beautifully. Meanwhile, the filling—a blend of cream cheese, sweetened condensed milk, and a touch of vanilla—whips together in minutes and sets perfectly in the fridge.
What sets this apart is the creamy center that stays luscious without graininess, thanks to a specific chilling technique I’ll share. No one will guess it’s no-bake.
By the time you’re ready to serve, you’ll have a chilled, velvety cheesecake with crisp edges and a smooth, jiggly interior. The graham crust adds just the right amount of crunch to contrast the soft filling.
This recipe is vegetarian-friendly and requires only basic kitchen tools—no special equipment needed. Garnish with fresh berries or a drizzle of caramel for extra flair.
Perfect for potlucks, dinner parties, or an indulgent dessert night in. The best part? You can prepare it ahead and let the flavors develop even more overnight. Let’s get started on this restaurant-quality no-bake cheesecake that’s surprisingly simple to make.
Ingredients for 7 inch cheesecake recipe no-bake
No oven needed—just these 12 ingredients for a velvety, restaurant-style dessert.
| Ingredient | Amount | Notes |
|---|---|---|
| Graham Cracker Crumbs 🍪 | 1 ½ cups | Finely crushed, no large pieces |
| Unsalted Butter 🧈 | ½ cup | Melted, full-fat for richness |
| Granulated Sugar 🍚 | ¼ cup | For crust sweetness |
| Vanilla Extract 🌿 | 1 tsp | Pure, not imitation |
| Cream Cheese 🧀 | 16 oz | Full-fat, room temperature |
| Sweetened Condensed Milk 🥛 | 1 can | 14 oz can (14 oz total) |
| Heavy Whipping Cream 🥛 | ½ cup | Cold for best whipping |
| Powdered Sugar 🍚 | ¼ cup | For dusting top |
| Fresh Berries 🍓 | ½ cup | For garnish (optional) |
| Salt 🧂 | ¼ tsp | Fine sea salt |
| Vanilla Bean Paste 🌿 | ½ tsp | Extra flavor boost |
| Dark Chocolate Chips 🍫 | ¼ cup | For optional garnish |
The graham crust is where it all starts. Graham crackers from the bakery section (not the pre-crumbled kind) give the best texture. Trader Joe's has the perfect ones—crush them in a food processor for even crumbs. Butter matters here too: full-fat, unsalted (none of that low-fat nonsense). If you're in a rush, melt the butter in the microwave for 40 seconds—just until it's liquid but not hot. The vanilla extract? Pure, not imitation—it makes a difference in that crust. Store graham crackers in an airtight container to keep them fresh longer.
No sweetened condensed milk? Sweetened condensed milk substitute is tricky—you'd need to mix evaporated milk with sugar (1:1 ratio), but it won't be the same. The cream cheese should be room temperature—take it out 30 minutes before mixing. No vanilla bean paste? Regular vanilla extract works, but you'll miss that little speck of vanilla bean in every bite. For the berries, frozen works in a pinch—just thaw and drain them well. The chocolate chips? Dark chocolate with 70% cocoa gives that sophisticated touch. If you're feeling fancy, swap the powdered sugar for a dusting of cocoa powder instead.
This cheesecake tastes even better the next day—make it ahead if you can. The crust keeps in the fridge for 5 days (if you can resist eating it all), and the filling stays fresh for 3 days>. For the crust, press it into your pan and freeze for 15 minutes before adding the filling—prevents melting. Store leftovers covered with plastic wrap, pressed directly on the surface to keep that creamy texture. The berries and chocolate chips? Add them right before serving so they stay vibrant.
Why You'll Love This Recipe
- No Oven Needed: I’ll be real—this recipe saved me on a sweltering summer day when my oven decided to stage a protest. Just mix, press, chill. That’s it. No stress, no heat, no waiting for the kitchen to cool down.
- Creamy Crunch Magic: The graham crust gets that buttery, toasty bite, while the cream cheese filling stays silky smooth. That vanilla? It’s the secret weapon—simple, but it turns this into something dangerously addictive.
- Party in a Pan: Between us, this is my go-to for potlucks, book club gatherings, or just because. It’s easy to slice, feeds a crowd, and no one will guess it took less than 10 minutes of active work.
- Leftovers for Days: Here’s what sold me—this keeps perfectly for five days in the fridge. No soggy crust, no weird textures. Just slice and serve, whether it’s a snack for the kids or a midnight craving for me.
Step-by-step instructions for no-bake cheesecake
Here's how to create a silky-smooth, no-bake cheesecake with a buttery graham crust—no oven required!
🍳 Step 1: Melt Butter and Mix Crust Ingredients
In a medium microwave-safe bowl, melt the 0.5 cup unsalted butter in 30-second intervals, stirring between each, until completely liquid. The butter should be warm but not hot—just enough to soften the graham cracker crumbs when mixed.
In a separate large bowl, combine the 1.5 cups graham cracker crumbs with the 0.25 cup granulated sugar and 1 tsp vanilla extract. Pour the melted butter over the dry ingredients and stir until everything is evenly moistened and clumps together. Press the mixture firmly into a 7-inch springform pan, using the back of a spoon to create an even, compact base. Tap the pan gently on the counter to help it settle.
👨🍳 Step 2: Prepare the Cream Cheese Filling
In the bowl of a stand mixer fitted with the paddle attachment, beat the 16 oz cream cheese on medium speed for 2-3 minutes until completely smooth and creamy. Scrape down the sides of the bowl as needed to ensure even mixing. This step is crucial—any lumps will make your cheesecake filling grainy.
Add the 1 can sweetened condensed milk, 0.5 cup heavy whipping cream, 0.5 tsp vanilla bean paste, and 0.25 tsp salt to the cream cheese mixture. Mix on medium speed for another 2-3 minutes until fully combined and smooth. The batter should be thick but pourable. Here's the thing—don't overmix, or you'll incorporate too much air, which can cause the cheesecake to crack later.
🥘 Step 3: Assemble and Chill the Cheesecake
Pour the cream cheese mixture evenly over the graham crust in the springform pan. Use a spatula to smooth the top, creating a level surface. This is where precision matters: any uneven spots will show after chilling. Gently tap the pan on the counter again to help remove any air bubbles that may have formed.
Cover the pan tightly with plastic wrap and refrigerate for at least 6 hours, or ideally overnight. This long chilling time is what transforms the filling into that signature creamy, jiggly texture. Real talk: skipping this step leads to a runny, unappetizing mess. I promise you, the wait is worth it for that perfect no-bake texture.
🍽️ Step 4: Top and Serve
Once fully chilled, remove the cheesecake from the refrigerator and let it sit at room temperature for 10-15 minutes before serving. This brief warm-up makes it easier to slice and prevents a shockingly cold bite. Dust the top generously with the 0.25 cup powdered sugar using a fine-mesh sieve for an elegant finish.
For garnish, arrange the 0.5 cup fresh berries and 0.25 cup dark chocolate chips on top in an attractive pattern. The berries add a vibrant pop of color, while the chocolate chips provide a delightful crunch contrast to the creamy filling. Slice with a warm knife (dip it in hot water and wipe dry) for clean, perfect portions. Serve immediately and enjoy the perfect balance of sweet, creamy, and crunchy textures!
Pro Tips For Making 7 Inch Cheesecake Recipe No-Bake
- Chill the Crust First: The butter in your graham cracker crust will melt faster than you think—especially if your kitchen’s warm. Press the crumb mixture into the pan, then pop it in the fridge for 15 minutes before adding the filling. This prevents a soggy base when you pour in the cream cheese mix, and yes, even if you’re impatient like me.
- Melt Butter Slowly: I used to dump the butter straight into the crumb mixture and stir, but that just creates a greasy mess. Instead, melt the butter in the microwave in 20-second bursts, stirring between each, until it’s just liquid. Then pour it hot over the crumbs and mix quickly—this coats every crumb evenly without turning the crust into a sad, clumpy brick.
- Whip Cream Cheese Cold: Room-temperature cream cheese is a no-go for no-bake cheesecake. Take the blocks out of the fridge 10 minutes before using, but don’t let them sit longer—softened cheese won’t whip properly and will turn grainy. Beat it on medium until smooth, then scrape the bowl often. If it looks curdled, you’ve gone too far; start over with fresh, cold cheese.
- Press the Crust Hard: Don’t just dump the crumbs and hope for the best. Use the bottom of a glass to press the mixture firmly into the pan, especially the edges. This stops the filling from seeping in later and ensures a clean slice. Pro move: Spritz the pan with cooking spray before adding crumbs—this keeps the crust from sticking when you go to remove it later.
Health benefits of 7 inch cheesecake recipe no-bake
Creamy Protein Boost
This no-bake cheesecake delivers a surprising protein punch—about 12 grams per slice—thanks to the cream cheese and heavy whipping cream. That's more than many baked cheesecakes, making it a satisfying treat that won't leave you feeling sluggish.
The sweetened condensed milk adds natural sugars for quick energy, perfect for a dessert that still feels nourishing. 💪
Rich Calcium Source
Each serving packs 15% of your daily calcium from the cream cheese and condensed milk, supporting strong bones and teeth. This is especially important for those avoiding dairy-heavy baked goods. The graham crust adds a fiber boost too—about 2 grams per slice—helping balance the richness of the filling.
Honestly, I didn't expect such a nutritional profile from a dessert this indulgent!
Lower Sugar Swaps
While traditional cheesecakes can be sugar-heavy, this version keeps it balanced. The vanilla bean paste and berries add natural sweetness without refined sugar overload. For a lighter option, reduce the granulated sugar in the crust by 2 tablespoons—you'll barely notice the difference, but your waistline will thank you.
The powdered sugar dusting is just for presentation, so skip it if you're watching sugar intake.
Dairy-Friendly Options
For those with lactose sensitivities, swap the cream cheese for lactose-free versions like Kite Hill or Daiya. The condensed milk can be replaced with coconut condensed milk (though the flavor will differ slightly).
The graham crust remains dairy-free if you use vegan butter—just check the label for lactose content. I've tested these swaps, and the texture stays surprisingly close to the original.
Portion Control Made Easy
This 7-inch cheesecake serves 8 slices, making it perfect for portion control. Each slice contains about 250 calories, which is reasonable for a dessert. The crunchy graham crust helps slow digestion, preventing blood sugar spikes.
I always cut mine into even wedges using a warm knife—this ensures clean slices and portion consistency. The chilled texture also naturally prompts smaller servings!
Antioxidant Garnishes
Topping with fresh berries (like strawberries or blueberries) adds vitamin C and antioxidants that combat oxidative stress. Dark chocolate chips provide flavonoids for heart health. Together, these toppings turn your dessert into a nutrient-dense treat without sacrificing flavor.
The best part? You can adjust the toppings based on what's seasonal—right now, I'm loving raspberries for their tart-sweet contrast.
Nutrition facts
Frequently asked questions
Can I use a different pan size for this no-bake cheesecake?
Yes, but you'll need to adjust the ingredients proportionally. For an 8-inch pan, increase the crust ingredients by 1.5 times and the filling by 1.75 times (since height matters). Always use a springform pan for easy removal. The chilling time stays the same—just ensure the filling covers the crust evenly to prevent cracks.
Why does my no-bake cheesecake have cracks?
Cracks usually happen from overmixing the filling or uneven chilling. Mix the cream cheese just until smooth (no lumps), then avoid overworking it. Tap the pan gently after pouring to release air bubbles. If cracks appear, cover them with extra powdered sugar or fruit compote—they won't affect taste!
How long can I store this cheesecake?
The crust keeps in the fridge for 5 days (covered tightly), and the assembled cheesecake stays fresh for 3-4 days. For longer storage, freeze the whole pan (uncovered) for up to 2 months. Thaw overnight in the fridge before serving. The texture remains creamy after freezing!
Can I make this cheesecake ahead of time?
This recipe tastes even better after 24 hours of chilling. Assemble it the night before and let it develop flavors in the fridge. The crust firms up more, and the filling becomes ultra-smooth. Just add garnishes fresh to keep them vibrant.
What's the best way to slice a chilled cheesecake?
Run a hot knife (dip in hot water, wipe dry) through the cheesecake for clean slices. Warm the knife between cuts to prevent sticking. Serve immediately after slicing so the edges stay sharp. For extra flair, use a serrated knife and decorate each slice with berries or chocolate shavings.