
Desserts
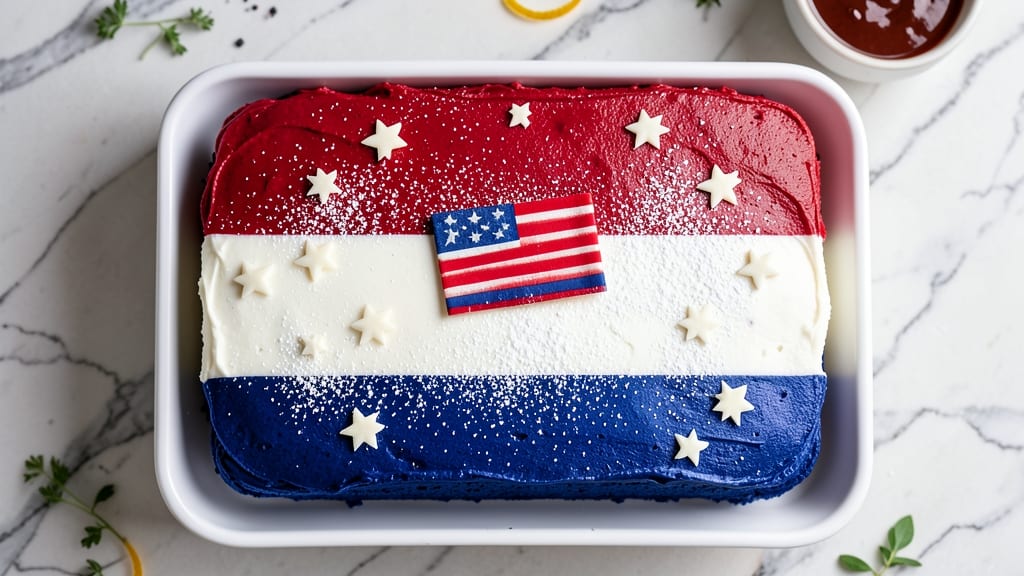
This American flag sheet cake recipe transforms a simple dessert into a showstopping centerpiece—perfect for patriotic celebrations, birthdays, or any occasion calling for bold, eye-catching layers. The secret lies in precise buttercream piping and vibrant food coloring to achieve that iconic red, white, and blue design without smudging. I’ve perfected this technique over years of baking for Memorial Day parades and Fourth of July gatherings, ensuring crisp layers and sharp lines every time.
The cake itself is a classic vanilla sheet cake, but the magic happens in the frosting—a smooth, stable buttercream that holds its shape for clean stripes and stars. You’ll divide the batter into three layers, bake them separately, then assemble with precision to create a sturdy base for decorating.
The key is chilling the cake between layers to prevent crumbling, while the frosting must be piped at room temperature for crisp, defined lines.
What you’ll end up with is a visually stunning dessert that looks as impressive as it tastes—moist vanilla cake with rich buttercream, all topped with a perfectly symmetrical flag design. The red and blue layers stay vibrant, the white stripes are sharp, and the stars are crisp enough to photograph.
This isn’t just a cake; it’s a conversation piece that doubles as a patriotic centerpiece.
Whether you’re baking for a family reunion or a community event, this recipe scales beautifully and delivers consistent results. The instructions walk you through every step—from layering and baking to piping techniques and plating—so even beginners can achieve professional-looking results.
Let’s get started on creating a dessert that’s as bold as it is delicious.
Ingredients for american flag sheet cake
Classic ingredients with vibrant colors transform into a patriotic centerpiece.
| Ingredient | Amount | Notes |
|---|---|---|
| All-Purpose Flour 🌾 | 3 ½ cups | Sifted for light texture |
| Granulated Sugar 🍚 | 2 cups | Divided for batter and buttercream |
| Unsalted Butter 🧈 | 1 ½ cups | Room temperature for smoothness |
| Large Eggs 🥚 | 4 whole | Room temperature for even baking |
| Milk 🥛 | 1 ½ cups | Room temperature for smooth batter |
| Vanilla Extract 🌿 | 2 tsp | Pure extract for authentic flavor |
| Baking Powder 🧂 | 2 tsp | Light baking powder for lift |
| Salt 🧂 | ½ tsp | Fine sea salt for balance |
| Red Food Coloring 🎨 | 1 tsp | Gel-based for vibrant color |
| Blue Food Coloring 🎨 | 1 tsp | Gel-based for vibrant color |
| White Food Coloring 🎨 | ½ tsp | Optional for extra brightness |
| Powdered Sugar 🍚 | 4 cups | Sifted for smooth buttercream |
| Heavy Whipping Cream 🥛 | 1 cup | Cold for stable buttercream |
The all-purpose flour is your foundation—look for King Arthur or Gold Medal for reliable texture. Unsalted butter matters here; Plugrá or Land O’Lakes work perfectly when softened to room temperature. For the food coloring, Wilton gel-based is the gold standard—it won’t bleed into your cake like liquid dyes. The vanilla extract should be pure, not imitation, and Nestlé or McCormick are reliable brands. Pro tip: Divide your batter into three separate bowls before adding color—this keeps your layers vibrant and prevents cross-contamination.
No gel food coloring? Natural beet powder for red and blue spirulina can work in a pinch, though the colors may fade faster. Short on butter? Coconut oil or shortening can substitute, but texture will differ slightly. For the buttercream, if you’re avoiding dairy, vegan butter or coconut cream works well (though it’ll be slightly softer). The powdered sugar should be sifted to avoid lumps—Domino or C&H brands are finely ground and ideal. And if you’re worried about the cake sticking, line your pans with parchment paper—unbleached parchment works best for baking.
Store the dry ingredients like flour and powdered sugar in airtight containers to keep them fresh. The butter and eggs should be used within 2 days of opening for best results, while the food coloring lasts 1 year unopened. Once baked, the cake layers can be wrapped in plastic and frozen for 3 months—just thaw at room temperature before assembling. The buttercream can be made a day ahead and stored in the fridge, then whipped back to room temperature before piping. For a showstopping presentation, chill the finished cake for 1 hour before slicing—this helps the colors stay sharp.
Why You'll Love This Recipe
- No Mixer Needed: Mixing the batter is just creaming butter and sugar—no stand mixer required. I’ve done it by hand with a wooden spoon while chatting with my kids, and it still turns out light and fluffy every time.
- Buttercream Magic: That rich, velvety buttercream layer? It’s made with just powdered sugar, softened butter, and a splash of milk—no fancy stabilizers. The contrast between the dense vanilla cake and the smooth frosting is chef’s kiss.
- Party in a Pan: One sheet cake = endless options. Cut it into squares for a crowd, slice it into bars for lunchboxes, or freeze half for later. Honestly, I’ve used it for birthdays, potlucks, and even as a quick dessert when my book club shows up unannounced.
- Budget-Friendly Showstopper: Flour, sugar, butter, eggs, milk—these are pantry staples, not specialty items. The frosting uses the same ingredients as the cake, so you’re not buying extra stuff. Plus, it feeds 12 for under $10, and the leftovers? They disappear fast.
Step-by-step instructions for American flag sheet cake
Here's how to create a showstopping patriotic cake with perfect layers and vibrant colors.
Prepare the Three Colored Batters
Begin by preheating your oven to 350°F and greasing a 9x13-inch baking pan. In a large mixing bowl, cream together the 1.5 cups unsalted butter and 1 cup granulated sugar (half of the total) until light and fluffy. This is your base batter that will be divided for all three colors.
In a separate bowl, whisk together the 3.5 cups all-purpose flour, 2 teaspoons baking powder, and 0.5 teaspoon salt. Gradually add this dry mixture to the butter-sugar combination along with the 2 teaspoons vanilla extract and 1.5 cups milk. Mix until just combined—don't overmix or your cake will be dense. Divide this batter evenly into three bowls.
To the first bowl, add 1 teaspoon red food coloring and mix until evenly distributed. To the second bowl, add 1 teaspoon blue food coloring and mix thoroughly. For the third bowl, add 0.5 teaspoon white food coloring (optional for extra brightness) and mix well. Each batter should have a vibrant, consistent color—this is your foundation for the iconic American flag pattern.
Bake the Three Layers Separately
Pour the red batter into the prepared pan and spread it evenly. Bake for 12-15 minutes or until a toothpick inserted in the center comes out clean. Remove from the oven and immediately pour the blue batter over the red layer, spreading it evenly to create a smooth transition. Return to the oven and bake for another 12-15 minutes.
Once the blue layer is baked, carefully remove the pan from the oven and pour the white batter over the blue layer. Spread this evenly to create the final white stripe. Return to the oven and bake for the final 12-15 minutes. The cake should be golden brown on top and spring back when gently pressed—this indicates it's fully baked.
I've found that baking each layer separately ensures even cooking and prevents the colors from bleeding into each other. Let the cake cool completely in the pan for 1 hour before attempting to remove it—this prevents cracking when you transfer it to a wire rack.
Prepare the Buttercream Frosting
While the cake cools, prepare the buttercream by beating the 1.5 cups unsalted butter (remaining half) until smooth and creamy. Gradually add the 4 cups powdered sugar and mix on low speed until combined. Increase the speed to medium and whip for 3-5 minutes until light and fluffy.
Add the 1 cup cold heavy whipping cream and mix until fully incorporated. The buttercream should be thick enough to hold its shape but still pipeable. If it's too thick, add 1-2 tablespoons milk to loosen it. Taste and adjust sweetness if needed—you can add a bit more powdered sugar if desired, but the original recipe is perfectly balanced.
This buttercream needs to be chilled for 30 minutes before using—it will firm up slightly, making it easier to work with when creating the flag pattern. I like to spread a thin layer over the entire cake first to seal it, then chill for another 15 minutes before adding the final decorative layers.
Frost and Decorate the Cake
Once the cake is completely cool, use a long serrated knife to level the top if needed. Spread a thin layer of buttercream over the entire surface to create a smooth base. Then, using a piping bag fitted with a star tip, pipe the remaining buttercream in horizontal stripes to create the classic American flag pattern.
Start with a thin white stripe at the top, followed by a red stripe, then alternating red and white stripes. Finish with a blue rectangle in the top left corner. Use a small offset spatula to smooth the edges between colors. For extra authenticity, you can pipe small white stars onto the blue field using a tiny round tip.
The key to a perfect flag cake is patience—take your time aligning the stripes straight and keeping the colors vibrant. Once decorated, let the cake rest at room temperature for 1 hour before slicing to allow the buttercream to set properly. This final resting period ensures clean cuts and prevents the frosting from smudging.
Slice and Serve with Confidence
Use a sharp, long serrated knife to slice the cake into 4 equal servings. Dip the knife in hot water and wipe it dry between each cut to prevent the frosting from smearing. Each slice should reveal the distinct red, white, and blue layers you worked so hard to create.
Serve immediately for the freshest texture and most vibrant colors. The cake will hold its shape well for 2-3 hours at room temperature, making it perfect for patriotic celebrations. For longer storage, cover tightly with plastic wrap and refrigerate for up to 3 days, though I recommend enjoying it fresh for the best experience.
Pro Tips For Making American Flag Sheet Cake
- Preheat to 350°F: DESCRIPTION: This recipe demands it—no exceptions. I used to skip this step, thinking "close enough" would work, but the edges burn before the center sets. A hot oven ensures even baking, especially with the butter-heavy layers. Trust me, your cake will thank you when it comes out flat and golden, not charred on the sides.
- Cream Butter and Sugar Longer: DESCRIPTION: Don’t just mix until it looks combined—beat the butter and sugar for 3-4 minutes until it’s pale and ribbony. That extra time dissolves more sugar into the fat, making the cake tender and rich. I learned this the hard way when my first batch turned out dense because I rushed. (Yes, even if you’re impatient like me.)
- Sift the Flour Twice: DESCRIPTION: The American flag layers rely on a smooth batter, and clumps of flour are the enemy of even texture. Sift the flour into the bowl before adding it to the mixer, then give it a quick whisk to break up any lingering lumps. This isn’t the prettiest method, but it’s the tastiest—no surprise pockets of dry flour in your cake.
- Use Room-Temp Eggs: DESCRIPTION: Cold eggs mix unevenly and can cause the batter to curdle, leading to a cake that’s tough or uneven. Let them sit in warm water for 10 minutes if they’re straight from the fridge. I was skeptical until I tried it—the difference in texture is noticeable, especially in a layered cake where every layer matters.
Wine and beer pairings for this american flag sheet cake
Patriotic Wine Pairings
The bold red and blue layers of this cake pair beautifully with dry red wines that complement the richness of the buttercream. A Cabernet Sauvignon from Napa Valley—like Louis M. Martini Cabernet—brings deep berry notes that contrast the sweetness while standing up to the cake's intensity.
The tannins cut through the frosting beautifully, cleansing your palate between bites. 🍷
Citrus-Infused Whites
For a lighter option, try a Sauvignon Blanc with zesty citrus notes that mirror the cake's vibrant colors. I love Kim Crawford Sauvignon Blanc from New Zealand—its bright acidity balances the sweetness while enhancing the vanilla flavors in the cake. Serve it slightly chilled for the best experience.
Beer Pairing Perfection
A crisp American lager like Budweiser or Coors Banquet works surprisingly well, especially if you prefer beer over wine. The light malt sweetness complements the cake's buttercream without overpowering it.
For a craft option, try a Belgian witbier like Hoegaarden—the coriander and citrus notes add a refreshing contrast to the rich dessert.
Non-Alcoholic Options
For guests who don't drink, serve sparkling apple cider like Martinelli's Sparkling—its effervescence and slight tartness cut through the sweetness. Alternatively, a ginger beer like Brew Dr. Brown's adds a spicy kick that pairs wonderfully with the cake's vanilla and buttercream richness.
Serving Temperature Tips
Always serve wine and beer slightly chilled—around 45-50°F for whites and 55-60°F for reds—to enhance their flavors against the cake's warm, buttery notes. Let your drinks breathe for 10-15 minutes before serving to open up their aromas and make them even more complementary. 💫
Nutrition facts
Frequently asked questions
Can I make this cake in a round pan instead of a sheet pan?
Yes, but you'll need to adjust the baking time and technique. For a 9-inch round cake pan, divide the batter into three thin layers (about ½-inch thick each) and bake them separately for 8-10 minutes per layer at 350°F. Chill each layer completely before adding the next to prevent crumbling. The frosting technique remains the same, but you'll need to pipe the stripes in a circular pattern to mimic the flag's design.
Why did my food coloring bleed into the cake layers?
This usually happens when the batter is too wet or the food coloring isn't properly mixed. Use gel-based coloring (like Wilton) and fold it gently into the batter to avoid overmixing. Also, ensure your butter and eggs are at room temperature—they should blend smoothly without adding extra moisture. If the colors still bleed, try baking each layer separately in individual pans before assembling.
How do I make the stars look crisp and professional?
Use a small round piping tip (Wilton #2 or #3) and pipe tiny dots of white buttercream onto the blue field. For sharp edges, chill the cake for 30 minutes after piping the stars, then use a toothpick to gently press the center of each star to create a slight depression. This mimics the raised stars on the real flag. Work quickly to prevent the frosting from melting in warm rooms.
Can I substitute vanilla cake mix for the recipe?
You can, but expect less vibrant colors and a denser texture. For best results, use a high-quality boxed mix (like Betty Crocker) and add an extra 1 teaspoon vanilla extract and 1 tablespoon milk to improve moisture. Reduce the baking time by 2-3 minutes per layer, as boxed mixes often bake faster. The frosting technique remains the same, but homemade batter yields superior layers and sharper colors.
How do I transport this cake without smudging the frosting?
Wrap the cake tightly in plastic wrap, then place it on a sturdy tray. For extra protection, cover the top with a second layer of plastic secured with rubber bands. Keep it refrigerated until serving (up to 2 hours) and let it sit at room temperature for 15 minutes before slicing. If transporting for more than 3 hours, freeze the cake (unfrosted) and transport it frozen—thaw in the fridge overnight before decorating.