
Desserts
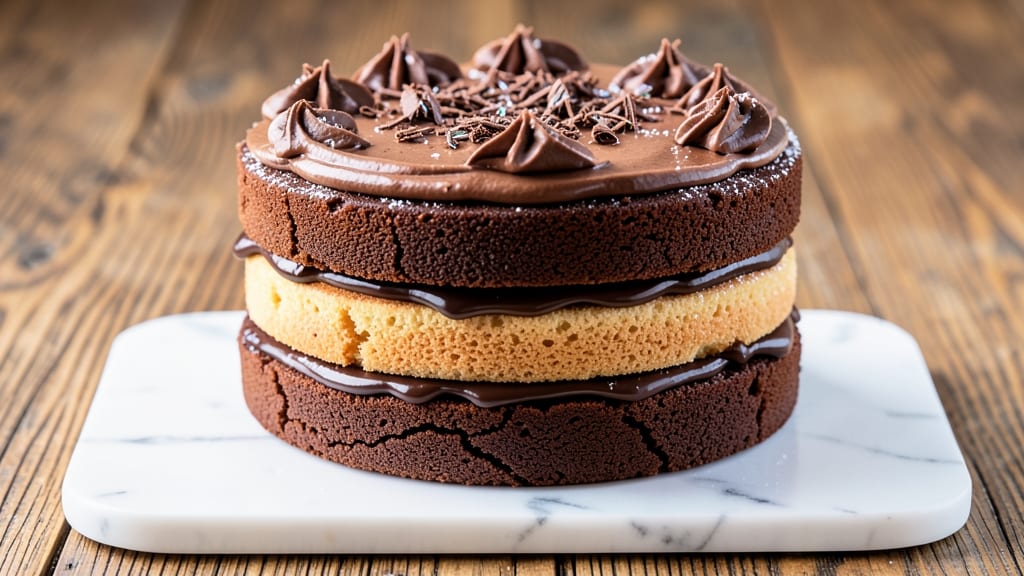
This 3 layer chocolate fudge cake recipe delivers the kind of decadence that makes every slice feel like a celebration. 💛 The secret lies in perfectly balanced layers—moist, rich chocolate cake with a velvety fudge filling that melts at the slightest touch, all crowned with a smooth, glossy frosting that holds its shape.
I've baked this cake for holidays, birthdays, and just-because moments, and it never fails to impress.
The cake itself is where the magic begins: a tender crumb achieved through precise mixing and baking times, ensuring each layer stays moist without becoming dense.
The fudge filling, made with melted chocolate and butter, requires patience—it needs to cool just enough to set properly before assembly, creating that signature gooey texture between every bite. This isn't your average boxed-mix cake; it's a showstopper that tastes like it came from a bakery.
What sets this recipe apart is the balance of techniques: traditional methods like room-temperature ingredients and gradual baking ensure perfect layers, while modern shortcuts—like using high-quality cocoa powder and a simple frosting recipe—keep it accessible.
The result is a cake that's rich in flavor but light enough to enjoy without feeling weighed down. Every forkful delivers that perfect harmony of chocolate intensity and creamy smoothness.
Once assembled, the cake needs time to set before slicing—this is where the real magic happens. The layers marry together, creating a texture that's both sturdy and indulgent.
Whether you're serving it at a gathering or treating yourself to a solo indulgence, this cake is designed to be the star of the dessert table. Here's how to bring it to life in your own kitchen.
Ingredients for 3 layer chocolate fudge cake
Rich cocoa layers, velvety fudge, and glossy frosting—this cake delivers decadence with precision.
| Ingredient | Amount | Notes |
|---|---|---|
| All-Purpose Flour 🌾 | 3 ½ cups | Sifted for light texture |
| Unsalted Butter 🧈 | 2 ¼ cups | Room temperature, European preferred |
| Granulated Sugar 🍚 | 2 ½ cups | Superfine for smoother texture |
| Cocoa Powder 🍫 | 1 cup | High-quality Dutch-processed |
| Large Eggs 🥚 | 6 whole | Room temperature for even baking |
| Baking Powder 🧂 | 1 ½ tsp | Freshly measured for lift |
| Salt 🧂 | 1 tsp | Fine sea salt preferred |
| Whole Milk 🥛 | 1 ½ cups | Room temperature for blending |
| Vanilla Extract 🌿 | 2 tsp | Pure Madagascar bourbon |
| Dark Chocolate Chips 🍫 | 1 ½ cups | 70% cacao for filling |
| Heavy Whipping Cream 🥛 | 1 ½ cups | Full-fat for frosting stability |
| Powdered Sugar 🍚 | 4 cups | For glossy frosting finish |
| Butter (for frosting) 🧈 | 1 cup | Room temperature, salted preferred |
The cocoa powder is where you won't cut corners. Valrhona or Callebaut make all the difference here—anything labeled 'natural' or 'Dutch-processed' will give you that deep, smooth chocolate flavor. For the butter, European-style brands like Plugrá or Kerrygold have higher fat content, which keeps the cake tender. I always buy mine in bulk from Costco or Whole Foods—the difference in texture is noticeable. The eggs should be at room temperature, so take them out 30 minutes before mixing. And if you're using superfine sugar, it's worth the splurge for that silky crumb.
No Dutch-processed cocoa? Natural cocoa plus 1/4 tsp baking soda mimics the flavor. Short on butter? Vegetable shortening works in a pinch, but the cake won't be as rich. For the fudge filling, Ghirardelli chocolate squares melt beautifully, but any high-quality dark chocolate (70% cacao or higher) will do. The frosting can be made with cream cheese for a tangier twist, but traditional buttercream delivers that classic richness. Pro tip: if your frosting is too thick, microwave it in 10-second bursts—don't overheat or it'll seize up.
This cake needs time to set—at least 4 hours in the fridge before slicing. The layers marry together beautifully overnight, so if you're baking ahead, do it. Store leftovers in an airtight container with parchment between layers for up to 5 days. For freezing, wrap each layer individually in plastic wrap, then aluminum foil—up to 3 months. The frosting can be made a day ahead and chilled until ready to use. And if you're serving at room temperature, bring it out 30 minutes before guests arrive for the perfect balance of firmness and creaminess.
Why You'll Love This Recipe
- No Mixer Needed: I swear, this cake comes together with just a whisk and a spatula—no stand mixer or fancy tools. The butter and sugar get creamed by hand in minutes, and the cocoa powder dissolves right into the wet ingredients. Honestly, it’s the kind of recipe that makes me feel like a baking pro without the hassle.
- Fudgy, Cakey, Repeat: That perfect balance of dense fudge layers and tender crumb? It’s all in the ratio of cocoa powder to sugar and how you fold in the eggs. The first bite gives you that rich, melt-in-your-mouth chocolate, but the layers hold together like a dream. Between us, this is the kind of cake that disappears faster than I can say “second slice.”
- Birthday or Breakfast: Serve it warm with vanilla ice cream for a birthday celebration, or cut it into squares for a weekend brunch with coffee. I’ve even packed it in a cooler for potlucks—it holds up better than most cakes. The layers stay moist, and the flavor only gets better the next day. (Yes, even on a Tuesday morning.)
- Pantry Staples Only: You’re probably already stocked for this. Flour, butter, sugar, cocoa, eggs—that’s it. No specialty ingredients or last-minute grocery runs. And because it’s dense, a single cake feeds a crowd or lasts me three days of “just one more piece” moments. Budget-friendly doesn’t get much better than this.
Step-by-step instructions for 3 layer chocolate fudge cake
Here's the precise method for decadent, moist layers and velvety frosting—every detail matters.
👨🍳 Step 1: Prepare the Cake Batter for Maximum Moisture
Preheat your oven to 350°F and grease three 8-inch round cake pans with butter, then line the bottoms with parchment paper. In a stand mixer fitted with the paddle attachment, beat the 2.25 cups unsalted butter and 2.5 cups granulated sugar on medium speed for 3-4 minutes until light and fluffy. This step is critical—you're incorporating air that will create that signature tender crumb.
Reduce speed to low and add the 6 whole large eggs, one at a time, mixing just until each is fully incorporated. Scrape down the sides of the bowl as needed. In a separate bowl, sift together the 3.5 cups all-purpose flour, 1 cup cocoa powder, 1.5 teaspoons baking powder, and 1 teaspoon salt. With the mixer on low speed, gradually add the dry ingredients to the wet, alternating with the 1.5 cups whole milk, beginning and ending with the flour mixture. Mix just until combined—overmixing develops gluten and makes the cake dense.
🍳 Step 2: Fold in Chocolate Chips for Rich Depth
Remove the bowl from the mixer and gently fold in the 1.5 cups dark chocolate chips using a silicone spatula. Be careful not to overmix—just distribute them evenly throughout the batter. Divide the batter evenly among the prepared cake pans, smoothing the tops with a spatula. Place the pans in the preheated oven and bake for 25-30 minutes, or until a toothpick inserted into the center comes out with just a few moist crumbs (not wet batter).
I know it seems like too short a time for a rich chocolate cake, but this is where the high-quality cocoa powder and proper mixing technique prevent a dry result. Rotate the pans halfway through baking for even heat distribution. Let the cakes cool in the pans for 10 minutes, then transfer to a wire rack to cool completely before assembling—this prevents crumbling when layering.
🥘 Step 3: Make the Chocolate Ganache Filling
While the cakes cool, prepare the ganache by combining the 1.5 cups heavy whipping cream and 1.5 cups dark chocolate chips in a heatproof bowl. Place the bowl over a pot of simmering water (double boiler method) and stir gently until the chocolate melts completely and the mixture becomes smooth. Remove from heat and let it cool slightly—it should thicken as it cools but remain pourable. This ganache will be the luxurious filling between each cake layer.
Here's the thing—don't rush this step. The ganache needs to reach a temperature where it's thick enough to hold its shape but still spreadable. If it's too runny, chill it for 10 minutes before using. You want it to create that signature marbled effect when layered.
🍽️ Step 4: Assemble the Cake with Precision
Once the cakes are completely cool, level the tops if necessary using a serrated knife. Place the first cake layer on a cake stand or plate. Spread ½ cup of the cooled ganache evenly over the top, leaving a ½-inch border uncovered. Repeat with the second cake layer, then the third. The final layer should have the remaining ganache spread over the top and sides.
For a professional finish, I recommend using a long metal spatula to smooth the ganache between layers. This creates clean lines and prevents messy edges. Place the assembled cake in the refrigerator for 1 hour to let the ganache set completely before frosting.
👨🍳 Step 5: Create the Ultimate Chocolate Buttercream
In a stand mixer fitted with the paddle attachment, beat the 1 cup butter (for frosting) on medium speed until smooth and creamy, about 2-3 minutes. Gradually add the 4 cups powdered sugar, mixing on low speed until combined. Increase speed to medium and beat for 3-4 minutes until light and fluffy. Add the 2 teaspoons vanilla extract and mix for another 30 seconds.
Spread the buttercream evenly over the chilled cake, using a long offset spatula to create smooth sides. For extra decadence, I like to add a thin layer of the leftover ganache between the buttercream and cake—this creates that signature marbled effect. Finally, dust the top with a light coating of cocoa powder using a fine-mesh sieve for a beautiful finish.
Pro Tips For Making 3 Layer Chocolate Fudge Cake
- MELT THE BUTTER FIRST: Don’t just toss cold butter into the dry ingredients—melt it first and let it cool to room temperature. I learned this the hard way when my cake turned out dense and greasy. Warm butter blends better with the cocoa and sugar, but if it’s too hot, the eggs will scramble before they emulsify. Aim for butter that’s soft enough to press with a finger but not liquid.
- SIFT THE COCOA: Cocoa powder clumps like a stubborn guest who won’t leave. Sift it with the flour to break up any lumps and distribute it evenly—this prevents dry spots in your cake. I used to just dump it in, and half the time, I’d end up with a cake that tasted like it had a secret pocket of unsweetened chocolate.
- BAKE UNTIL SPRINGY: The cake’s edges might look done, but poke the center with a toothpick—it should come out with moist crumbs, not wet batter. I used to pull cakes too soon, and they’d collapse under the filling. A toothpick test every 2–3 minutes in the last 5 minutes of baking is your best friend.
- CHILL THE LAYERS: Stacking warm layers is a recipe for a soggy disaster. Let each cake layer cool completely on a wire rack, then refrigerate them for at least 30 minutes before assembling. This keeps the frosting from melting into a puddle and gives you clean slices. (Yes, even if you’re impatient like me.)
Pro cooking tips for this dish
Batter Mixing Mastery
For that signature tender crumb, beat the butter and sugar together for a full 3-4 minutes until light and fluffy—this incorporates maximum air. I use a stand mixer with the paddle attachment on medium speed for consistent results.
When adding eggs, let each one fully incorporate before adding the next to prevent curdling. 💫
Sift your dry ingredients together before mixing to avoid lumps in the batter. Alternating between dry ingredients and milk in thirds ensures even distribution without overmixing. I find using a kitchen scale for the flour (weighing 440 grams total) gives more consistent results than measuring cups.
Ganache Perfection
The ganache filling is where many home bakers go wrong—it needs to be at the right temperature when applied. Heat the cream just until it begins to simmer, then pour it over chopped chocolate in a heatproof bowl.
Let it sit for 2 minutes before gently stirring until smooth. This resting period prevents graininess. 🍫
For a marbled effect between layers, spread the ganache with a spatula, then immediately swirl it with a toothpick before adding the next cake layer. Chill the assembled cake for 1 hour before frosting to let the ganache set properly—this prevents messy sliding between layers.
Layering Like a Pro
Use a long metal spatula to create clean, straight edges when leveling cake layers. I like to place a ½-inch border of ganache around each layer to prevent crumbling when stacking.
For extra stability, freeze the cake for 10 minutes before adding the final layer—this helps the ganache adhere better. 💪
When frosting, use a bench scraper to create perfectly smooth sides. I start with a thin layer of buttercream, then add a second layer for full coverage. For that bakery-style finish, dust the top with Valrhona cocoa powder using a fine-mesh sieve—this creates an even, professional-looking coat.
Oven Temperature Secrets
Don't overbake the cake layers—25-30 minutes at 350°F is perfect for this recipe. A toothpick should come out with just a few moist crumbs, not wet batter. I rotate the pans halfway through baking for even heat distribution, especially if your oven has hot spots. 🌡️
Let the cakes cool completely in their pans for 10 minutes before transferring to a wire rack. This gradual cooling prevents cracking. If you're in a hurry, you can use a cake cooling rack with fans to speed up the process—just be gentle when moving the pans.
Equipment Essentials
Invest in a quality stand mixer with a paddle attachment—this makes mixing butter and sugar much easier than using hand mixers. I also recommend a long offset spatula for frosting and a bench scraper for clean edges. A kitchen scale is invaluable for precise measurements, especially with flour. 💡
For the ganache, a double boiler setup prevents overheating the chocolate. I use a heatproof glass bowl that fits snugly over a saucepan. A fine-mesh sieve is perfect for dusting cocoa powder on top, while a serrated knife helps level cake layers evenly.
These tools make all the difference in professional-looking results.
Nutrition facts
Frequently asked questions
Can I make this cake with boxed mix?
You can adapt it, but expect a less rich result. Use a high-quality chocolate boxed mix and add 1/2 cup extra cocoa powder and 1/2 cup melted butter to the batter for deeper flavor. Replace the ganache with store-bought fudge sauce (thickened with cornstarch) and use a stable buttercream. The texture won't be as tender, but it's a faster option for special occasions.
Why is my ganache too runny when I assemble the cake?
This usually happens when the ganache is too hot or not cooled enough. Let it sit at room temperature for 10-15 minutes after melting, then test by dipping a spoon in ice water—if it sets immediately, it's ready. For extra stability, chill the ganache for 20 minutes before using. If it's still too thin, add 1 tablespoon cornstarch mixed with 1 teaspoon water and stir gently.
How do I store leftovers to keep them fresh?
Wrap each layer individually in plastic wrap, then place the whole cake in an airtight container with parchment between layers. Store at room temperature for 2 days or refrigerate for 5 days. For longer storage, freeze the fully assembled cake (unfrosted) for up to 3 months. Thaw overnight in the fridge before serving. Never refreeze thawed cake.
Can I substitute the buttercream with cream cheese frosting?
Replace the buttercream with a 4:3 ratio cream cheese to butter frosting (e.g., 16 oz cream cheese + 12 oz butter) sweetened with 3 cups powdered sugar and flavored with 1 teaspoon vanilla. Whip until ultra-smooth for a tangy contrast to the rich chocolate layers. The frosting will be slightly denser but adds beautiful texture. Chill the cake longer (2 hours) before slicing.
What's the best way to level cake layers for clean edges?
Use a serrated knife and a leveling guide (like a ruler or cake leveler) for perfect horizontal cuts. Place the cake on the guide and hold the knife at a 45-degree angle to saw back and forth until you reach the guide. Wipe the knife with a damp cloth between cuts. For extra stability, freeze the cake for 10 minutes before leveling—this prevents crumbling.