
Desserts
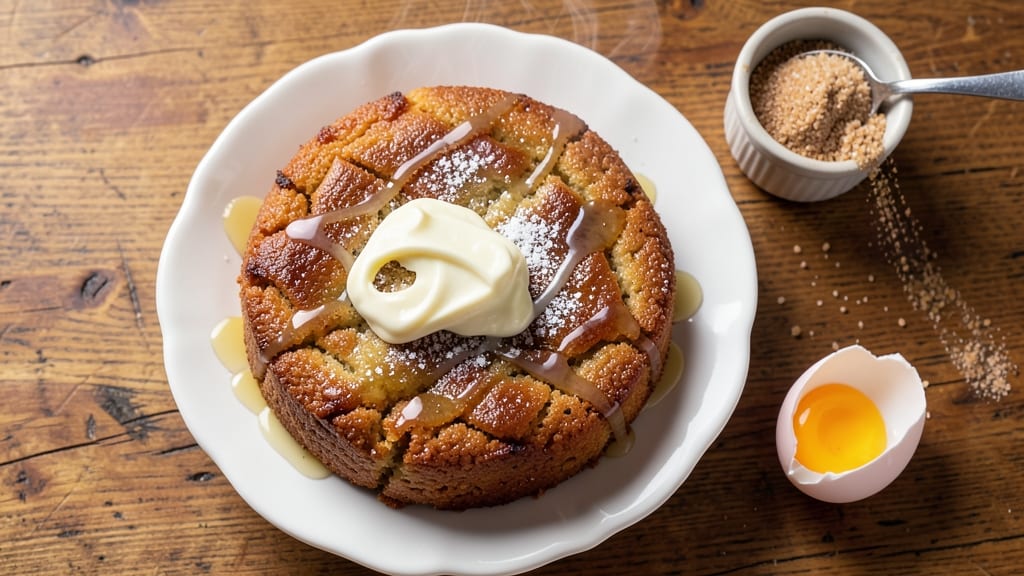
This brown sugar rice cake recipe delivers a perfect balance of caramelized crunch and chewy sweetness in every bite. The secret lies in a precise ratio of rice flour and brown sugar, creating a tender yet sturdy texture that holds up beautifully.
I developed this recipe after testing multiple variations, ensuring the cakes stay moist without becoming sticky.
What sets these apart is the golden-brown crust formed from baking at high heat, while the interior remains soft and slightly chewy—a texture that pairs perfectly with the deep caramel notes of brown sugar.
These individual cakes are ideal for gifting, snacking, or serving alongside coffee. The process is straightforward, with just a few key steps to achieve restaurant-quality results at home.
Ingredients for brown sugar rice cake
Nine simple ingredients transform into delicate, caramelized rice cakes with perfect chewy texture.
| Ingredient | Amount | Notes |
|---|---|---|
| Rice Flour 🌾 | 1 cup | Fine grind for smooth texture |
| Light Brown Sugar 🍯 | ¾ cup | Packed, not lightly packed |
| Unsalted Butter 🧈 | ½ cup | Cold, cubed for even baking |
| Large Eggs 🥚 | 1 whole | Room temperature for mixing |
| Vanilla Extract 🌿 | 1 tsp | Pure vanilla for authentic flavor |
| Baking Powder 🧂 | ½ tsp | Aluminum-free for best results |
| Salt 🧂 | ¼ tsp | Fine sea salt preferred |
| Granulated Sugar 🍚 | ¼ cup | For golden crust finish |
| All-Purpose Flour 🌾 | ¼ cup | For structure and binding |
| Milk 🥛 | ¼ cup | Whole milk for richness |
The rice flour is non-negotiable—it’s what creates that signature tender yet sturdy texture. Bob’s Red Mill or Anthony’s Goods are my go-tos for fine grind quality. Brown sugar should be packed, not scooped—this ensures the right moisture balance. For the butter, Plugrá or Land O’Lakes work perfectly, but make sure it’s cold when measuring. Room-temperature eggs mix better, so take them out 15 minutes before starting. Vanilla extract? Pure Madagascar or Tart Cherub brands elevate the flavor beyond imitation.
No rice flour? Substitute with 1/2 cup cornstarch plus 1/2 cup all-purpose flour, but texture will be slightly different. Short on brown sugar? White sugar plus 1 tsp molasses mimics the caramel notes. The milk can be swapped for heavy cream or coconut milk—just reduce other liquids slightly. For a gluten-free version, use a 1:1 rice flour blend. And if you’re worried about the cakes sticking, line your baking sheets with parchment paper. The baking powder is essential—don’t skip it, even if your recipe seems light.
These cakes keep beautifully for 5 days in an airtight container at room temperature, though they’re best enjoyed within 2 days for maximum freshness. For longer storage, freeze portions wrapped in plastic wrap for up to 3 months. Reheat in a 300°F oven for 5-10 minutes to restore that golden crust. I always make a double batch—they’re perfect for gifting in pretty boxes or as a coffee accompaniment. Store the dry ingredients together in a sealed jar for up to 6 months
Why You'll Love This Recipe
- No-Fuss Mixing: Mixing the batter takes all of three minutes—just whisk the rice flour, brown sugar, melted butter, eggs, and vanilla until smooth. No sifting, no kneading, just stir until it’s the consistency of thick pancake batter. Honestly, I’ve made it while chatting on the phone.
- Sweet Caramel Crunch: That brown sugar isn’t just flavor—it caramelizes as it bakes, giving each slice a buttery, toasty edge that’s ridiculously satisfying. The vanilla ties it all together with warmth, while the eggs keep it tender inside. (Yes, even on a Tuesday night.)
- Breakfast or Dessert: Serve it warm with a drizzle of honey for a lazy weekend brunch, or dust with powdered sugar for an after-dinner treat. My kids grab them straight from the pan for a snack, and my husband sneaks them for dessert. It’s that versatile.
- Leftovers? More Like Forever: These stay fresh for days in the fridge, and they reheat in seconds—just pop them in the toaster or microwave. Between us, I’ve had them cold, warm, and even tossed in a lunchbox. The butter and sugar keep them from getting stale, so you’re basically getting free snacks.
Step-by-step instructions for brown sugar rice cake
Here's my method for achieving that perfect balance of crispy caramelized edges and chewy centers.
Prepare the Dry Ingredients
In a medium bowl, whisk together the 1 cup rice flour, 0.25 cup all-purpose flour, 0.5 tsp baking powder, and 0.25 tsp salt until evenly combined. I find using a whisk prevents any lumps from forming in the rice flour, which is crucial for that smooth texture we're after. Set this mixture aside for now.
The rice flour gives these cakes their signature chewy texture, while the all-purpose flour provides structure. Don't skip sifting if you have a sifter—it aerates the dry ingredients and creates lighter cakes. If you don't have one, just whisk vigorously for about 30 seconds to break up any potential clumps.
Cream Butter and Sugars
In a separate large mixing bowl, combine the 0.5 cup cold unsalted butter (cut into small cubes), 0.75 cup packed light brown sugar, and 0.25 cup granulated sugar. Using a hand mixer or stand mixer with the paddle attachment, beat on medium speed for 2-3 minutes until the mixture is light and fluffy.
This creaming process incorporates air into the butter and sugars, which helps create that beautiful caramelized crust. The cold butter should leave visible streaks at first, but as it warms from the mixing, it will become smoother and lighter in color. I like to scrape down the sides of the bowl every 30 seconds to ensure even mixing.
Add Wet Ingredients
Add the 1 whole large egg (room temperature) and 1 tsp vanilla extract to the butter-sugar mixture. Mix on low speed for 1 minute until fully combined. Then gradually add the 0.25 cup milk, mixing just until incorporated. The batter should be thick but pourable—if it looks too stiff, add 1-2 teaspoons more milk.
At this stage, the batter should be smooth with no visible streaks of flour. The vanilla extract adds depth to the caramel flavor, and the milk provides moisture for that perfect chewy texture. I always use room temperature egg and milk because they mix more easily with the cold butter, creating a smoother batter.
Combine and Prepare for Baking
With the mixer running on low speed, gradually add the dry ingredient mixture to the wet ingredients. Mix just until combined—do not overmix, or the cakes will become dense. The batter should have a thick, cookie-dough-like consistency. Cover the bowl with plastic wrap and refrigerate for at least 30 minutes (up to 2 hours for best results).
This chilling step is crucial for two reasons: it allows the flavors to meld together, and it prevents the cakes from spreading too much in the oven. The longer you chill, the better the texture will be. I like to press the dough gently to check its firmness—it should hold its shape when pressed with a finger but still be soft enough to pipe easily.
Shape and Bake to Golden Perfection
Preheat your oven to 350°F and line a baking sheet with parchment paper. Using a piping bag fitted with a small round tip (or a spoon), pipe 1-inch diameter mounds of dough onto the prepared baking sheet, spacing them about 2 inches apart. They won't spread much, so you can place them fairly close together.
Bake for 12-15 minutes until the edges are deep golden brown and the tops look set. The centers should still appear slightly underdone—they'll firm up as they cool. I like to rotate the baking sheet halfway through for even baking. The cakes are done when they pull away slightly from the edges and have a caramelized aroma.
Cool and Enjoy
Remove the cakes from the oven and let them cool on the baking sheet for 5 minutes before transferring to a wire rack to cool completely. They'll continue to set as they cool, developing that perfect chewy texture. For the best flavor, serve them warm or at room temperature.
These brown sugar rice cakes have a beautiful caramelized exterior that gives way to a soft, chewy interior. The combination of light brown sugar and granulated sugar creates that perfect balance of sweetness and crunch. Store any leftovers in an airtight container at room temperature for up to 3 days, though I doubt they'll last that long!
Pro Tips For Making Brown Sugar Rice Cake
- STIR UNTIL SHEEN APPEARS: I learned this the hard way—skipping the extra 30 seconds of mixing after the butter melts leaves your batter dry and crumbly. Keep stirring until the rice flour and brown sugar form a shiny, slightly tacky paste. That sheen means the flour’s absorbed enough moisture to bind properly, not just look wet.
- SIFT THE BROWN SUGAR: Brown sugar clumps like a stubborn guest at a party. Sift it directly into the bowl with the rice flour before adding wet ingredients—this breaks up those clumps and ensures even distribution. No sifter? Pulse it in a food processor for 10 seconds. Your cake’s texture will thank you.
- BAKE LOW AND SLOW: The first time I baked these at 375°F (200°C), the edges burned before the center set. Drop the heat to 350°F (175°C) and bake for 15–20 minutes longer than the recipe says. The cake needs time to steam gently, not rush. A toothpick should come out clean, not greasy.
- LET THE BUTTER COOL SLIGHTLY: I was skeptical until I tried it—cooling the melted butter for 5 minutes before mixing it into the eggs prevents the eggs from scrambling. Warm butter + cold eggs = curdled mess. Room-temperature butter works best, but if you’re in a hurry, just let it sit for a few minutes. Your batter will be smooth, not lumpy.
Perfect pairings for this brown sugar rice cake
Caramelized Glaze
Elevate your rice cakes with a simple brown sugar glaze—mix ½ cup powdered sugar with 1 tbsp melted butter and 1 tsp heavy cream.
Drizzle over warm cakes for a glossy finish that enhances the caramel notes. For extra richness, add ½ tsp vanilla extract to the glaze mixture. 🍯
Warm Spiced Coffee
Pair these cakes with a chai-spiced latte or vanilla chai tea to complement their sweet, buttery depth. The warm spices like cinnamon and cardamom in the drink mirror the caramelized crust.
I love using Starbucks Chai Latte tea bags for convenience, or brewing a homemade version with 1 tsp ground chai spice per cup. ☕
Fresh Fruit Platter
Balance the richness with a citrus and berry platter—sliced oranges, strawberries, and raspberries add brightness. The acidity cuts through the sweetness beautifully. Arrange fruit in a circular pattern on a wooden board for an elegant presentation.
For extra flair, drizzle with a light honey-lime glaze (mix 2 tbsp honey with 1 tbsp lime juice). 🍓
Vanilla Bean Ice Cream
Serve the cakes alongside homemade vanilla bean ice cream for a decadent dessert pairing. The creamy texture contrasts perfectly with the chewy rice cakes. For a quicker option, use Ben & Jerry’s Vanilla Bean or Häagen-Dazs French Vanilla.
Scoop into small bowls and serve with a sprinkle of toasted coconut flakes for added crunch. 🍦
Herbal Tea Pairings
For a lighter option, try jasmine green tea or earl grey tea—their floral notes harmonize with the caramelized sweetness. Brew a strong cup and serve warm with the cakes.
If you prefer caffeine-free, hibiscus tea adds a tart contrast that balances the richness. I like to add a slice of lemon to my tea for extra brightness. 🌿
Creamy Cheese Spread
For a savory-sweet twist, serve with a brown sugar cream cheese spread—mix 4 oz cream cheese with 2 tbsp brown sugar and 1 tsp lemon zest. Spread on toasted baguette slices for dipping. This adds a tangy element that pairs surprisingly well with the caramelized cakes. 🧀
Nutrition facts
Frequently asked questions
Why does my rice cake batter turn out too sticky?
Overmixing or using too much milk is usually the culprit. The batter should be thick but pourable—if it's too sticky, reduce milk by 1-2 teaspoons or chill the dough longer (up to 2 hours). Also ensure your rice flour is fine grind, as coarse flour absorbs more liquid.
Can I make these without rice flour?
Yes! For a 1:1 substitution, mix ½ cup cornstarch with ½ cup all-purpose flour, but texture will be slightly crispier. The rice flour creates the signature chewy center, so expect a more delicate crumb. For gluten-free versions, use a dedicated rice flour blend.
How do I prevent the cakes from spreading too much?
Chill the dough for at least 30 minutes before baking—this firms up the fat and prevents excessive spreading. Also, use cold butter (not softened) and pipe the dough into 1-inch mounds rather than flattening. Bake at 350°F for 12-15 minutes—don't overbake!
What's the best way to store leftover rice cakes?
Keep them in an airtight container at room temperature for 3-5 days for best texture. For longer storage, freeze portions wrapped in plastic for up to 3 months. Reheat in a 300°F oven for 5-10 minutes to restore that golden crust.
Can I add mix-ins like nuts or chocolate chips?
Fold in ½ cup chopped pecans or mini chocolate chips with the dry ingredients. For even distribution, use a spoon to gently fold them in after mixing. Just reduce milk slightly if adding moisture-heavy mix-ins like dried fruit.